Create a Blockchain Running the Subnet EVM
Introduction
One of the core features of Avalanche is the ability to create new blockchains. Avalanche supports the creation of new instances of the Ethereum Virtual Machine (EVM). In this tutorial, we’ll create a C-Chain alike blockchain by creating a new instance of the Subnet EVM. Subnet EVM is a fork of Avalanche's Coreth VM, simplified and adapted specifically for subnets.
If you're interested in building custom blockchains, see Create a Virtual Machine (VM) and Create a Custom Blockchain.
Note: IDs of Blockchains, Subnets, Transactions and Addresses can be different for each run/network. It means that some inputs, endpoints etc. in the tutorial can be different when you try.
Ava-Sim
Ava-Sim can be used as a quick development and test environment for Subnet EVM. Detailed instructions can be found in the ava-sim repository README.
Building the VM
First start with cloning the Subnet EVM repository.
git clone [email protected]:ava-labs/subnet-evm.git
cd subnet-evm
Subnet VM has a build script that builds the binary of this VM.
The path to the executable, can be provided to the build script via arguments. For example:
./scripts/build.sh ./build/srEXiWaHuhNyGwPUi444Tu47ZEDwxTWrbQiuD7FmgSAQ6X7Dy
If no argument is given, the path defaults to $GOPATH/src/github.com/ava-labs/avalanchego/build/plugins/srEXiWaHuhNyGwPUi444Tu47ZEDwxTWrbQiuD7FmgSAQ6X7Dy
(The part srEXiWaHuhNyGwPUi444Tu47ZEDwxTWrbQiuD7FmgSAQ6X7Dy is the default ID of this VM.)
AvalancheGo searches for and registers plugins under [buildDir]/plugins/. You need to put built VM binary under this path. The [buildDir] defaults to the path of executed AvalancheGo binary. See here for more information.
Executable names must be either a full VM ID (encoded in CB58), or must be a VM alias defined by the VM Aliases Config. In this tutorial we used srEXiWaHuhNyGwPUi444Tu47ZEDwxTWrbQiuD7FmgSAQ6X7Dy as our VM ID.
Copy built VM binary into the AvalancheGo plugin directory. In this tutorial we put AvalancheGo and Subnet-EVM repositories under the same folder:
cp ./build/srEXiWaHuhNyGwPUi444Tu47ZEDwxTWrbQiuD7FmgSAQ6X7Dy ../avalanchego/build/plugins/
Running the Node
You will need a running node, a user on the node, and some AVAX in the address controlled by the user. All of that is covered in the Run an Avalanche Node tutorial.
Next, you need to have your node be a validator on the Primary Network. You can find out how to do that in the Add a Validator tutorial. It is recommended you do that with API calls, since that is the way you will be interacting with your node in the rest of this tutorial.
Create the Subnet
Every blockchain is validated by a subnet. Before you can create a blockchain, you’ll need a subnet to validate it. You can also use a subnet that already exists if you have a sufficient number of its control keys.
info
Add Validators to the Subnet
The subnet needs validators in it to, well, validate blockchains.
Create the Genesis Data
Each blockchain has some genesis state when it’s created. Each VM defines the format and semantics of its genesis data.
Subnet EVM Genesis
The default Subnet EVM provided below has some well defined parameters. The default Subnet EVM genesis looks like:
{
  "config": {
    "chainId": 43214,
    "homesteadBlock": 0,
    "eip150Block": 0,
    "eip150Hash": "0x2086799aeebeae135c246c65021c82b4e15a2c451340993aacfd2751886514f0",
    "eip155Block": 0,
    "eip158Block": 0,
    "byzantiumBlock": 0,
    "constantinopleBlock": 0,
    "petersburgBlock": 0,
    "istanbulBlock": 0,
    "muirGlacierBlock": 0,
    "subnetEVMTimestamp": 0,
    "feeConfig": {
      "gasLimit": 8000000,
      "minBaseFee": 25000000000,
      "targetGas": 15000000,
      "baseFeeChangeDenominator": 36,
      "minBlockGasCost": 0,
      "maxBlockGasCost": 1000000,
      "targetBlockRate": 2,
      "blockGasCostStep": 200000
    },
    "allowFeeRecipients": false
  },
  "alloc": {
    "8db97C7cEcE249c2b98bDC0226Cc4C2A57BF52FC": {
      "balance": "0x295BE96E64066972000000"
    }
  },
  "nonce": "0x0",
  "timestamp": "0x0",
  "extraData": "0x00",
  "gasLimit": "0x7A1200",
  "difficulty": "0x0",
  "mixHash": "0x0000000000000000000000000000000000000000000000000000000000000000",
  "coinbase": "0x0000000000000000000000000000000000000000",
  "number": "0x0",
  "gasUsed": "0x0",
  "parentHash": "0x0000000000000000000000000000000000000000000000000000000000000000"
}
Chain Config
chainID: Denotes the chainID of to be created chain. Must be picked carefully since a conflict with other chains can cause issues.
Hardforks
homesteadBlock, eip150Block, eip150Hash, eip155Block, byzantiumBlock, constantinopleBlock, petersburgBlock, istanbulBlock, muirGlacierBlock, subnetEVMTimestamp are hardfork activation times. Changing these may cause issues, so treat them carefully.
Fee Config
gasLimit: Gas limit of blocks.
minBaseFee: Minimum base fee of transactions. It is also the initial base fee for EIP-1559 blocks.
targetGas: The target gas consumption of blocks. If the network starts producing blocks with gas cost higher than this, base fees are increased accordingly.
baseFeeChangeDenominator: The amount the base fee can change between blocks.
minBlockGasCost: Minimum gas cost a block should cover.
maxBlockGasCost: Maximum gas cost a block should cover.
targetBlockRate: The targeted block rate that network should produce blocks. If the network starts producing faster than this, base fees are increased accordingly.
blockGasCostStep: The block gas cost change step between blocks.
Custom Fee Recipients
allowFeeRecipients: Enables fee recipients. By default, all fees are burned (sent to the blackhole address). However, it is possible to enable block producers to set a fee recipient (get compensated for blocks they produce).
With this enabled, your validators can specify their addresses to collect fees. They need to update their chain config with the following:
{
  "feeRecipient": "<YOUR 0x-ADDRESS>"
}
Note: If you enable this feature but a validator doesn't specify a "feeRecipient", the fees will be burned in blocks they produce.
Alloc
Alloc defines addresses and their initial balances. This should be changed accordingly for each chain. The alloc field expects key-value pairs. Keys of each entry must be a valid address. The balance field in the value can be either a hexadecimal or number to indicate initial balance of the address. The default value contains 8db97C7cEcE249c2b98bDC0226Cc4C2A57BF52FC with 50000000000000000000000000 balance in it. Default:
  "alloc": {
    "8db97C7cEcE249c2b98bDC0226Cc4C2A57BF52FC": {
      "balance": "0x295BE96E64066972000000"
    }
  }
Header
The fields nonce, timestamp, extraData, gasLimit, difficulty, mixHash, coinbase, number, gasUsed, parentHash defines the genesis block header. Changing these can cause issues. Leave default values if you're not sure.
Build Genesis
The Subnet EVM has a static API method named buildGenesis that takes in a JSON representation of a blockchain’s genesis state and returns the byte representation of that state. You should provide buildGenesis a full genesis like below, even if you don't intend to alter default values.
Remind that our VM ID was srEXiWaHuhNyGwPUi444Tu47ZEDwxTWrbQiuD7FmgSAQ6X7Dy. Calls will be made to /ext/vm/srEXiWaHuhNyGwPUi444Tu47ZEDwxTWrbQiuD7FmgSAQ6X7Dy/rpc:
To create the byte representation of this genesis state, call subnetevm.buildGenesis.
curl -X POST --data '{
  "jsonrpc": "2.0",
  "id": 1,
  "method": "subnetevm.buildGenesis",
  "params": {
    "genesisData": {
      "config": {
        "chainID": 13213,
        "homesteadBlock": 0,
        "eip150Block": 0,
        "eip150Hash": "0x2086799aeebeae135c246c65021c82b4e15a2c451340993aacfd2751886514f0",
        "eip155Block": 0,
        "eip158Block": 0,
        "byzantiumBlock": 0,
        "constantinopleBlock": 0,
        "petersburgBlock": 0,
        "istanbulBlock": 0,
        "muirGlacierBlock": 0,
        "subnetEVMTimestamp": 0,
        "feeConfig": {
          "gasLimit": 8000000,
          "targetBlockRate": 2,
          "minBaseFee": 13000000000,
          "targetGas": 15000000,
          "baseFeeChangeDenominator": 36,
          "minBlockGasCost": 0,
          "maxBlockGasCost": 1000000,
          "blockGasCostStep": 200000
        },
        "allowFeeRecipients": false,
      },
      "alloc": {
        "8db97C7cEcE249c2b98bDC0226Cc4C2A57BF52FC": {
          "balance": "333333333333333333333"
        }
      },
      "timestamp": "0x0",
      "gasLimit": "0x7A1200",
      "difficulty": "0x0",
      "mixHash": "0x0000000000000000000000000000000000000000000000000000000000000000",
      "coinbase": "0x0000000000000000000000000000000000000000",
      "number": "0x0",
      "gasUsed": "0x0",
      "parentHash": "0x0000000000000000000000000000000000000000000000000000000000000000"
    }
  }
}' -H 'content-type:application/json;' 127.0.0.1:9650/ext/vm/srEXiWaHuhNyGwPUi444Tu47ZEDwxTWrbQiuD7FmgSAQ6X7Dy/rpc
This returns the byte representation of your blockchain’s genesis state:
{
    "jsonrpc": "2.0",
    "result": {
        "genesisBytes": "FT1GtzvmB3sw5wm2qHXtxy7zXWSzxnoj5vNzu6XCqBCBry2d7MVhYfHg9LJkSpALjPpWKUK3wCGfr5syszjDkLSpEccQXNLvnvhrPTRjyBPdikKLLxqJFqrHpHcxVh3dnoxxP8DAp6h6Vvu4Y4xWU6SH9d5UfR8AHkQfaXLZGNgpj8EdtBALpyyS6KD5UY6W8MeYTfmtH5DW5hrsKZLe8oWEc62wEWNesruy6rtLjQ4He5wLh1Tq81PTdN4KJEmnrS68uYeZexPNZ6avxTDNWFLAqNVaMxuC1uuwzf366SxZsZjsm4t3MBwzSYiCQPYo7ruxXeN9xoqcZT2MoP1TTSTdeweFHdq1w9HT7RGdS2MzgJKy8YeU6enUXtWqcDtQ3BNb3Q6Bh11vdqPMoyRkWmFrcZTgc9jjaRx3XrRXY9wA4qCYRhjRYjKzSg5K463janpNkgvwH6eF4ev2xFcVFHFYqUVLpTEoigKesopASGkNf4v2HPQ1ZLvVofiEbfp5g9CfnKN2S7dkXvYbS2YdkjAo4G4M74uBRGpqrk4qJH6M1zqbFTZHnt6A1rsFBhnGEJFyw4Nimu5w6PTW9w3RLUFrnMejfscDLvN2ETGuXqX847Bd1Aw8NfMdqfvDfCjvAuX5se6BfTJYXMedDR6sWjjsEJGhiMLZpUfrgMzMtkZGVHqV5augcWPqHEjUXkLXEUCU8AcvdzNciRP9Q9s7ZzLqHauzdDc1ae2K9itGJVHXuyhqWk7xSGuZRusvutjxDDqfAngLHF5hqyku42ZaDtNYe7wSGyAdDt8a4VstuUd7LNmt2zHDescsAauEVZE6WjYSrc3dcmSQE5HV6zgEbqgSkEo5ZZMcb5xupT7GAyXn8opFH28kjTPgnnWZi6MNCdrvdMzgshwf3N5ecaJZh1vx9LSwUScw2jg8G6AF4bw7gBpB7t2P4EYd4LtMbNzQCS5Hexak7WEmdhcJ2s1Y2aYcs84F4QgHFy63FhfMxa3iDM252nHC4NPN2XMRd2cbzy59jBcMk99mderGstng25bsxyMhZFGQEnwbLZ4Xs3phCiwcAAo7wkNTyC7eWqmk7FNhGCovucBLgfjNLuUD4DMPEHMMrApknXQh132gp6uUvWbGFnoyDsamaB6L2sVAmo2cCg4Xk6tcNEm3KCdf8H4iXz1a7mbEzUcy9FmxGrhk1YppQryUXP97Nt2tQjd7GM2expSsxdTAyQFjoHeuGHbu6oNmdQLbFgprRd16hDeJJD9PxN79AQAojJQBU14LHN5vLEH5GoKDs7yoMa3iC7h",
        "encoding": "cb58"
    },
    "id": 1
}
You can also issue a subnetevm.decodeBlock to make sure your encoded genesis bytes are intact:
curl -X POST --data '{
    {
    "jsonrpc": "2.0",
    "id"     : 1,
    "method" : "subnetevm.decodeGenesis",
    "params" : {
        "encoding": "cb58",
        "genesisBytes":"FT1GtzvmB3sw5wm2qHXtxy7zXWSzxnoj5vNzu6XCqBCBry2d7MVhYfHg9LJkSpALjPpWKUK3wCGfr5syszjDkLSpEccQXNLvnvhrPTRjyBPdikKLLxqJFqrHpHcxVh3dnoxxP8DAp6h6Vvu4Y4xWU6SH9d5UfR8AHkQfaXLZGNgpj8EdtBALpyyS6KD5UY6W8MeYTfmtH5DW5hrsKZLe8oWEc62wEWNesruy6rtLjQ4He5wLh1Tq81PTdN4KJEmnrS68uYeZexPNZ6avxTDNWFLAqNVaMxuC1uuwzf366SxZsZjsm4t3MBwzSYiCQPYo7ruxXeN9xoqcZT2MoP1TTSTdeweFHdq1w9HT7RGdS2MzgJKy8YeU6enUXtWqcDtQ3BNb3Q6Bh11vdqPMoyRkWmFrcZTgc9jjaRx3XrRXY9wA4qCYRhjRYjKzSg5K463janpNkgvwH6eF4ev2xFcVFHFYqUVLpTEoigKesopASGkNf4v2HPQ1ZLvVofiEbfp5g9CfnKN2S7dkXvYbS2YdkjAo4G4M74uBRGpqrk4qJH6M1zqbFTZHnt6A1rsFBhnGEJFyw4Nimu5w6PTW9w3RLUFrnMejfscDLvN2ETGuXqX847Bd1Aw8NfMdqfvDfCjvAuX5se6BfTJYXMedDR6sWjjsEJGhiMLZpUfrgMzMtkZGVHqV5augcWPqHEjUXkLXEUCU8AcvdzNciRP9Q9s7ZzLqHauzdDc1ae2K9itGJVHXuyhqWk7xSGuZRusvutjxDDqfAngLHF5hqyku42ZaDtNYe7wSGyAdDt8a4VstuUd7LNmt2zHDescsAauEVZE6WjYSrc3dcmSQE5HV6zgEbqgSkEo5ZZMcb5xupT7GAyXn8opFH28kjTPgnnWZi6MNCdrvdMzgshwf3N5ecaJZh1vx9LSwUScw2jg8G6AF4bw7gBpB7t2P4EYd4LtMbNzQCS5Hexak7WEmdhcJ2s1Y2aYcs84F4QgHFy63FhfMxa3iDM252nHC4NPN2XMRd2cbzy59jBcMk99mderGstng25bsxyMhZFGQEnwbLZ4Xs3phCiwcAAo7wkNTyC7eWqmk7FNhGCovucBLgfjNLuUD4DMPEHMMrApknXQh132gp6uUvWbGFnoyDsamaB6L2sVAmo2cCg4Xk6tcNEm3KCdf8H4iXz1a7mbEzUcy9FmxGrhk1YppQryUXP97Nt2tQjd7GM2expSsxdTAyQFjoHeuGHbu6oNmdQLbFgprRd16hDeJJD9PxN79AQAojJQBU14LHN5vLEH5GoKDs7yoMa3iC7h"}
}
' -H 'content-type:application/json;' 127.0.0.1:9650/ext/vm/srEXiWaHuhNyGwPUi444Tu47ZEDwxTWrbQiuD7FmgSAQ6X7Dy/rpc
This should return the same genesis block, provided in subnetevm.buildGenesis call. Order of fields can be different:
{
    "jsonrpc": "2.0",
    "result": {
        "genesisData": {
            "config": {
                "chainId": 13213,
                "homesteadBlock": 0,
                "eip150Block": 0,
                "eip150Hash": "0x2086799aeebeae135c246c65021c82b4e15a2c451340993aacfd2751886514f0",
                "eip155Block": 0,
                "eip158Block": 0,
                "byzantiumBlock": 0,
                "constantinopleBlock": 0,
                "petersburgBlock": 0,
                "istanbulBlock": 0,
                "muirGlacierBlock": 0,
                "subnetEVMTimestamp": 0,
                "feeConfig": {
                    "gasLimit": 8000000,
                    "targetBlockRate": 2,
                    "minBaseFee": 13000000000,
                    "targetGas": 15000000,
                    "baseFeeChangeDenominator": 36,
                    "minBlockGasCost": 0,
                    "maxBlockGasCost": 1000000,
                    "blockGasCostStep": 200000
                }
            },
            "nonce": "0x0",
            "timestamp": "0x0",
            "extraData": "0x",
            "gasLimit": "0x7A1200",
            "difficulty": "0x0",
            "mixHash": "0x0000000000000000000000000000000000000000000000000000000000000000",
            "coinbase": "0x0000000000000000000000000000000000000000",
            "alloc": {
                "8db97c7cece249c2b98bdc0226cc4c2a57bf52fc": {
                    "balance": "0x1211ede4974a355555"
                }
            },
            "number": "0x0",
            "gasUsed": "0x0",
            "parentHash": "0x0000000000000000000000000000000000000000000000000000000000000000"
        },
        "encoding": "cb58"
    },
    "id": 1
}
Create the Blockchain
Now let’s create the new blockchain. To do so, we call platform.createBlockchain. Your call should look like the one below. You have to change subnetID to the subnet that will validate your blockchain, and supply a username that controls a sufficient number of the subnet’s control keys. As a reminder, you can find out what a subnet’s threshold and control keys are by calling platform.getSubnets.
Now let's create the blockchain by issuing the platform.createBlockchain call:
curl -X POST --data '{
    "jsonrpc": "2.0",
    "method": "platform.createBlockchain",
    "params" : {
        "subnetID": "29uVeLPJB1eQJkzRemU8g8wZDw5uJRqpab5U2mX9euieVwiEbL",
        "vmID":"srEXiWaHuhNyGwPUi444Tu47ZEDwxTWrbQiuD7FmgSAQ6X7Dy",
        "name":"My new EVM",
        "genesisData": "FT1GtzvmB3sw5wm2qHXtxy7zXWSzxnoj5vNzu6XCqBCBry2d7MVhYfHg9LJkSpALjPpWKUK3wCGfr5syszjDkLSpEccQXNLvnvhrPTRjyBPdikKLLxqJFqrHpHcxVh3dnoxxP8DAp6h6Vvu4Y4xWU6SH9d5UfR8AHkQfaXLZGNgpj8EdtBALpyyS6KD5UY6W8MeYTfmtH5DW5hrsKZLe8oWEc62wEWNesruy6rtLjQ4He5wLh1Tq81PTdN4KJEmnrS68uYeZexPNZ6avxTDNWFLAqNVaMxuC1uuwzf366SxZsZjsm4t3MBwzSYiCQPYo7ruxXeN9xoqcZT2MoP1TTSTdeweFHdq1w9HT7RGdS2MzgJKy8YeU6enUXtWqcDtQ3BNb3Q6Bh11vdqPMoyRkWmFrcZTgc9jjaRx3XrRXY9wA4qCYRhjRYjKzSg5K463janpNkgvwH6eF4ev2xFcVFHFYqUVLpTEoigKesopASGkNf4v2HPQ1ZLvVofiEbfp5g9CfnKN2S7dkXvYbS2YdkjAo4G4M74uBRGpqrk4qJH6M1zqbFTZHnt6A1rsFBhnGEJFyw4Nimu5w6PTW9w3RLUFrnMejfscDLvN2ETGuXqX847Bd1Aw8NfMdqfvDfCjvAuX5se6BfTJYXMedDR6sWjjsEJGhiMLZpUfrgMzMtkZGVHqV5augcWPqHEjUXkLXEUCU8AcvdzNciRP9Q9s7ZzLqHauzdDc1ae2K9itGJVHXuyhqWk7xSGuZRusvutjxDDqfAngLHF5hqyku42ZaDtNYe7wSGyAdDt8a4VstuUd7LNmt2zHDescsAauEVZE6WjYSrc3dcmSQE5HV6zgEbqgSkEo5ZZMcb5xupT7GAyXn8opFH28kjTPgnnWZi6MNCdrvdMzgshwf3N5ecaJZh1vx9LSwUScw2jg8G6AF4bw7gBpB7t2P4EYd4LtMbNzQCS5Hexak7WEmdhcJ2s1Y2aYcs84F4QgHFy63FhfMxa3iDM252nHC4NPN2XMRd2cbzy59jBcMk99mderGstng25bsxyMhZFGQEnwbLZ4Xs3phCiwcAAo7wkNTyC7eWqmk7FNhGCovucBLgfjNLuUD4DMPEHMMrApknXQh132gp6uUvWbGFnoyDsamaB6L2sVAmo2cCg4Xk6tcNEm3KCdf8H4iXz1a7mbEzUcy9FmxGrhk1YppQryUXP97Nt2tQjd7GM2expSsxdTAyQFjoHeuGHbu6oNmdQLbFgprRd16hDeJJD9PxN79AQAojJQBU14LHN5vLEH5GoKDs7yoMa3iC7h",
        "username":"USERNAME GOES HERE",
        "password":"PASSWORD GOES HERE"
    },
    "id": 1
}' -H 'content-type:application/json;' 127.0.0.1:9650/ext/P
The response contains the transaction ID:
{
    "jsonrpc": "2.0",
    "result": {
        "txID": "zZtgbGDPpJaz7zWL6cXi1sSJRW1sMQH4s119GURVYGPXkrUaE",
        "changeAddr": "P-avax103y30cxeulkjfe3kwfnpt432ylmnxux8r73r8u"
    },
    "id": 1
}
Verify Success
After a few seconds, the transaction to create our blockchain should have been accepted and the blockchain should exist (assuming the request was well-formed, etc.)
To check, call platform.getBlockchains. This returns a list of all blockchains that exist.
curl -X POST --data '{
    "jsonrpc":"2.0",
    "id"     :1,
    "method" :"platform.getBlockchains",
    "params" :{}
}' -H 'content-type:application/json;' 127.0.0.1:9650/ext/P
The response confirms that the blockchain was created:
{
    "jsonrpc": "2.0",
    "result": {
        "blockchains": [
            {
                "id": "zZtgbGDPpJaz7zWL6cXi1sSJRW1sMQH4s119GURVYGPXkrUaE",
                "name": "evm2",
                "subnetID": "29uVeLPJB1eQJkzRemU8g8wZDw5uJRqpab5U2mX9euieVwiEbL",
                "vmID": "srEXiWaHuhNyGwPUi444Tu47ZEDwxTWrbQiuD7FmgSAQ6X7Dy"
            },
            {
                "id": "2CA6j5zYzasynPsFeNoqWkmTCt3VScMvXUZHbfDJ8k3oGzAPtU",
                "name": "C-Chain",
                "subnetID": "11111111111111111111111111111111LpoYY",
                "vmID": "mgj786NP7uDwBCcq6YwThhaN8FLyybkCa4zBWTQbNgmK6k9A6"
            },
            {
                "id": "2eNy1mUFdmaxXNj1eQHUe7Np4gju9sJsEtWQ4MX3ToiNKuADed",
                "name": "X-Chain",
                "subnetID": "11111111111111111111111111111111LpoYY",
                "vmID": "jvYyfQTxGMJLuGWa55kdP2p2zSUYsQ5Raupu4TW34ZAUBAbtq"
            }
        ]
    },
    "id": 1
}
Validating the Blockchain
Every blockchain needs a set of validators to validate and process transactions on it. You can check if a node is validating a given blockchain by calling platform.getBlockchainStatus on that node:
curl -X POST --data '{
    "jsonrpc":"2.0",
    "id"     :1,
    "method" :"platform.getBlockchainStatus",
    "params" :{
        "blockchainID":"zZtgbGDPpJaz7zWL6cXi1sSJRW1sMQH4s119GURVYGPXkrUaE"
    }
}' -H 'content-type:application/json;' 127.0.0.1:9650/ext/P
{
  "jsonrpc": "2.0",
  "result": {
    "status": "Validating"
  },
  "id": 1
}
If it responds "Validating", the node is validating the given chain. If it responds "Syncing", then the chain tracked by this node but it is not validating. If it responde "Created" then the chain exists but it is not being synced. Note that in order to validate or watch a subnet, you need to start your node with argument --whitelisted-subnets=[subnet ID goes here] (e.g. --whitelisted-subnets=29uVeLPJB1eQJkzRemU8g8wZDw5uJRqpab5U2mX9euieVwiEbL) as well as add the node to the subnet's validator set.
More information can be found in the Adding a Subnet Validator tutorial.
Interacting with the New Blockchain
You can interact with this new instance of the EVM almost the same way you’d interact with the C-Chain. However the RPC API endpoint of your blockchain is 127.0.0.1:9650/ext/bc/zZtgbGDPpJaz7zWL6cXi1sSJRW1sMQH4s119GURVYGPXkrUaE/rpc. The last part in the endpoint is the blockchain ID. This can be a different ID when you create your blockchain. You can also alias this chain ID with mycchain for simpler API URLs. More information see admin.aliasChain.
Verify Chain ID
We specified a chainID of 13213, which is equivalent to 0x339d in hex. Let's verify our chain ID with the RPC call:
curl -X POST --data '{
    "jsonrpc": "2.0",
    "method": "eth_chainId",
    "params": [],
    "id": 1
}' -H 'content-type:application/json;' 127.0.0.1:9650/ext/bc/zZtgbGDPpJaz7zWL6cXi1sSJRW1sMQH4s119GURVYGPXkrUaE/rpc
Result should be:
{
  "jsonrpc": "2.0",
  "id": 1,
  "result": "0x339d"
}
Connect with Metamask
Subnet EVM supports almost every tool that C-Chain and EVM supports. For instance, let's connect Metamask with our Subnet EVM.
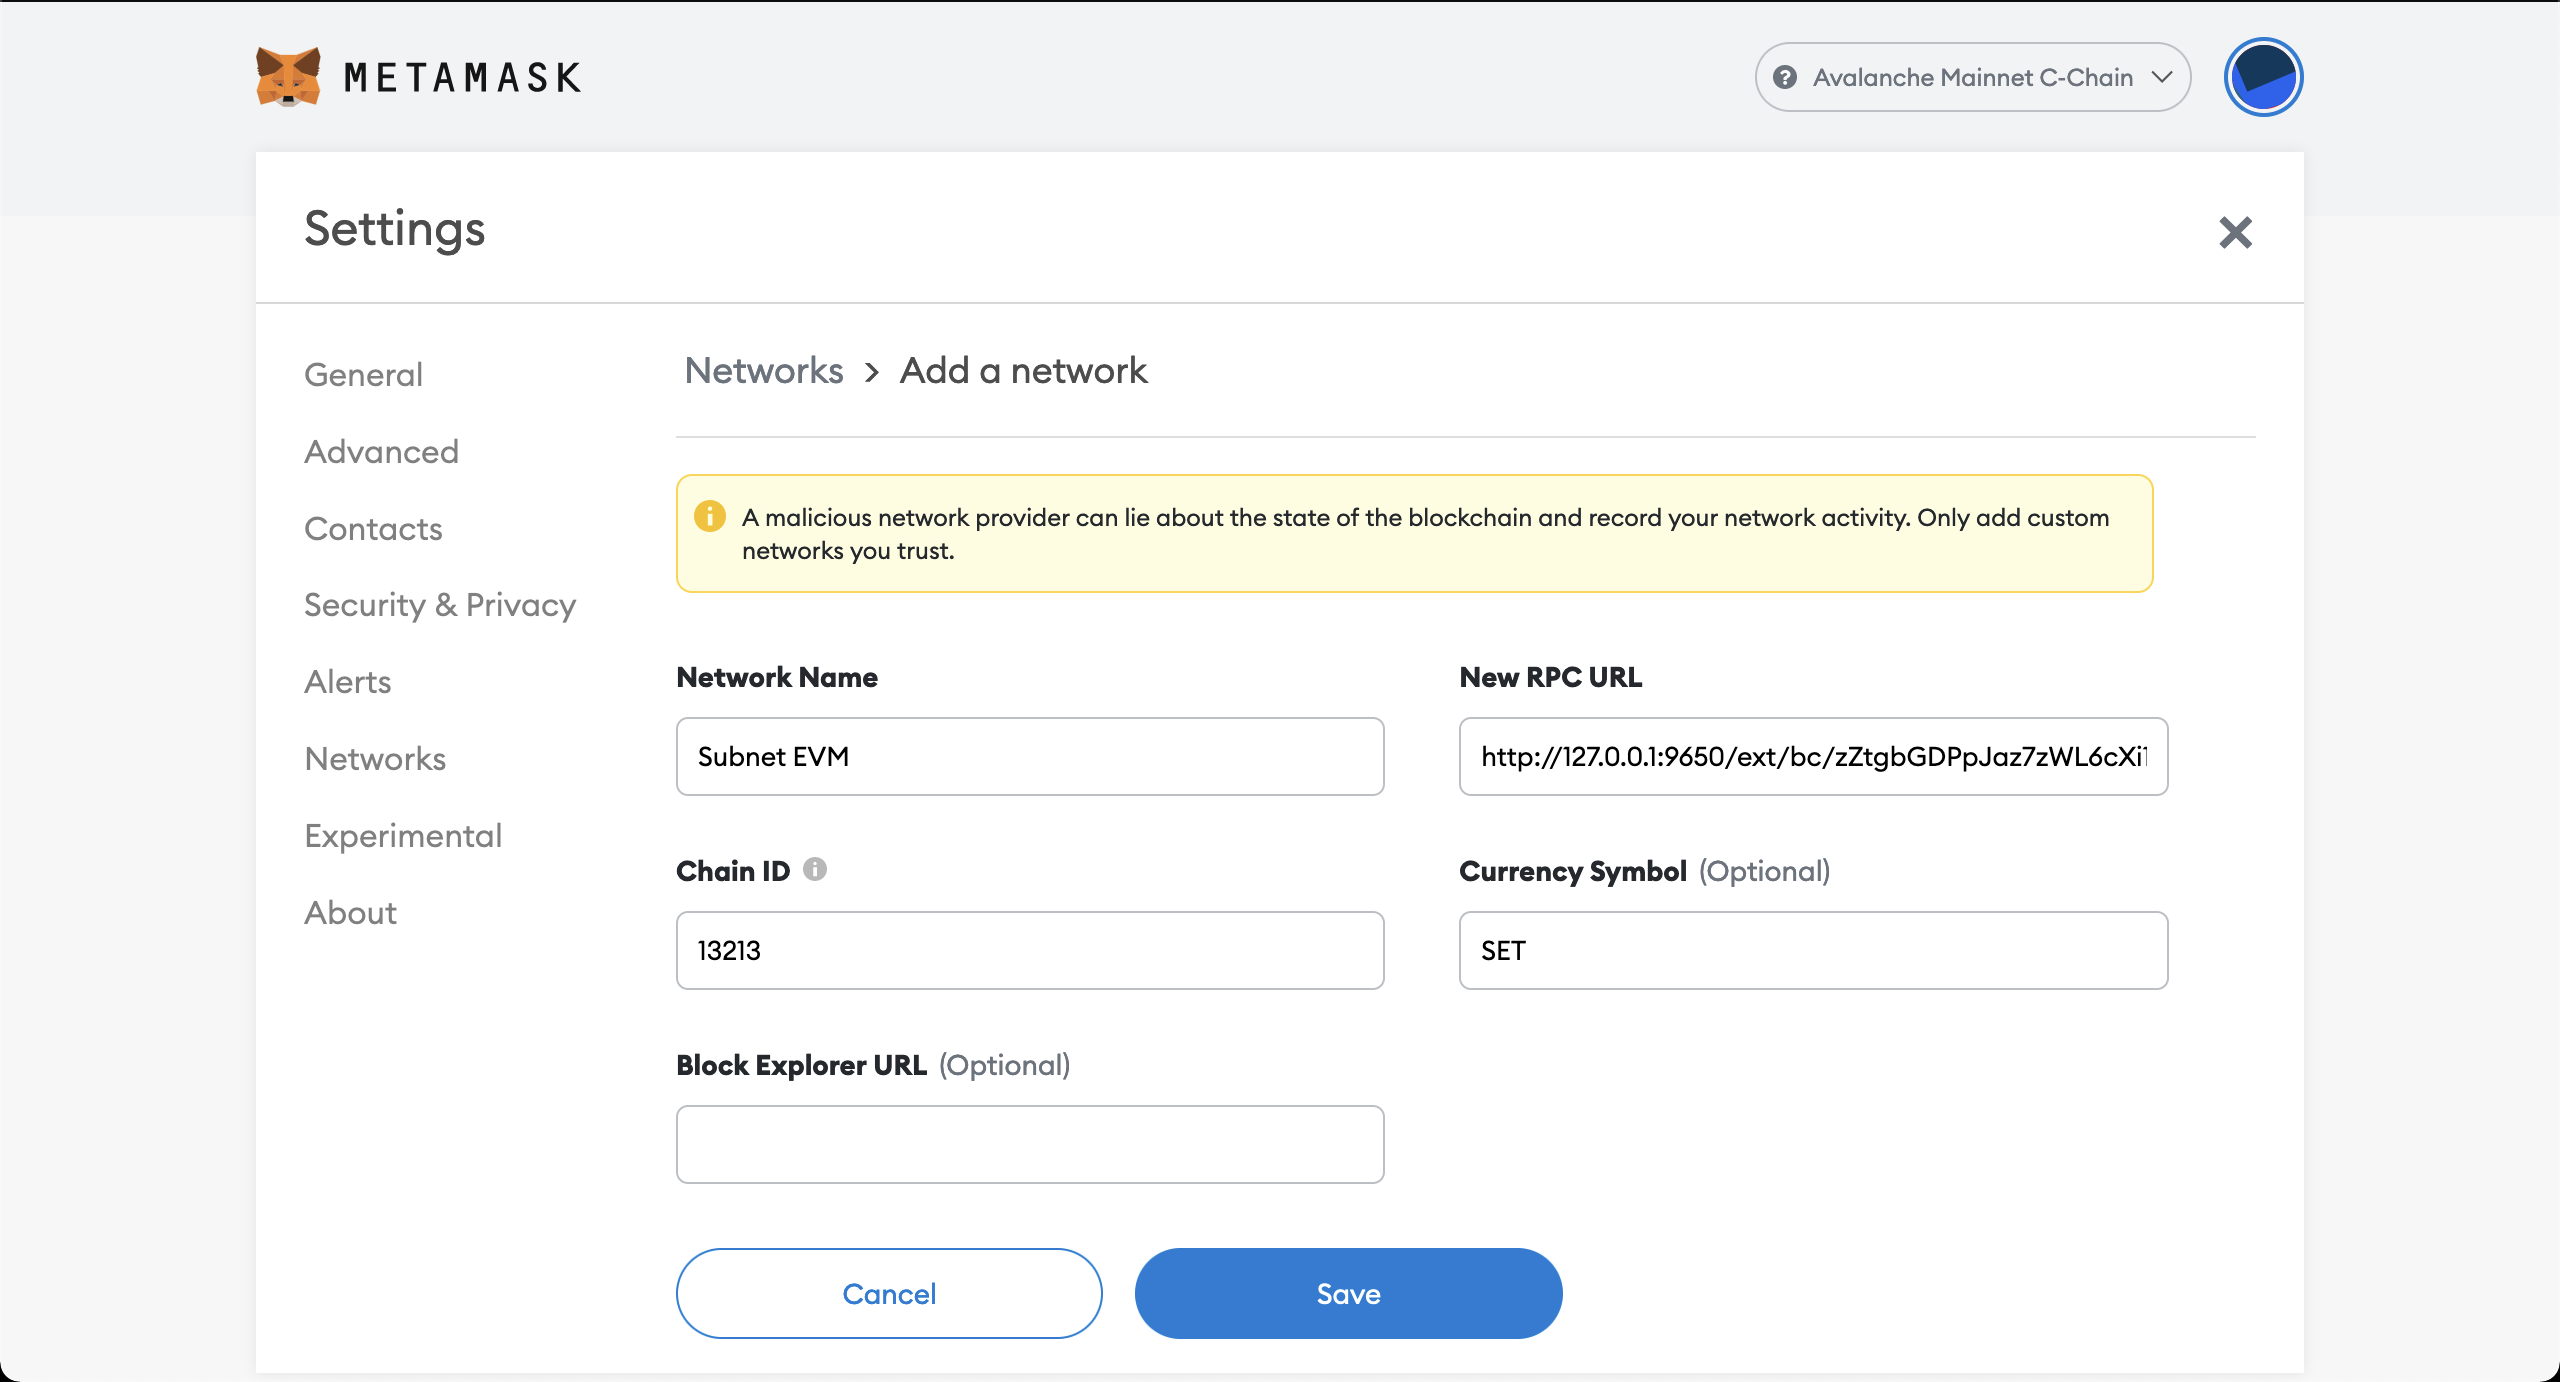
First we need to create a new network in Metamask. It can be added in Settings > Networks > Add a network.
Network Name: Any name to indicate this network.
New RPC URL: This must be the RPC URL of our node. In this case it is http://127.0.0.1:9650/ext/bc/zZtgbGDPpJaz7zWL6cXi1sSJRW1sMQH4s119GURVYGPXkrUaE/rpc
Chain ID: The Chain ID specified in genesis. In this case 13213.
Currency Symbol: Any symbol for this token.
It should look like:
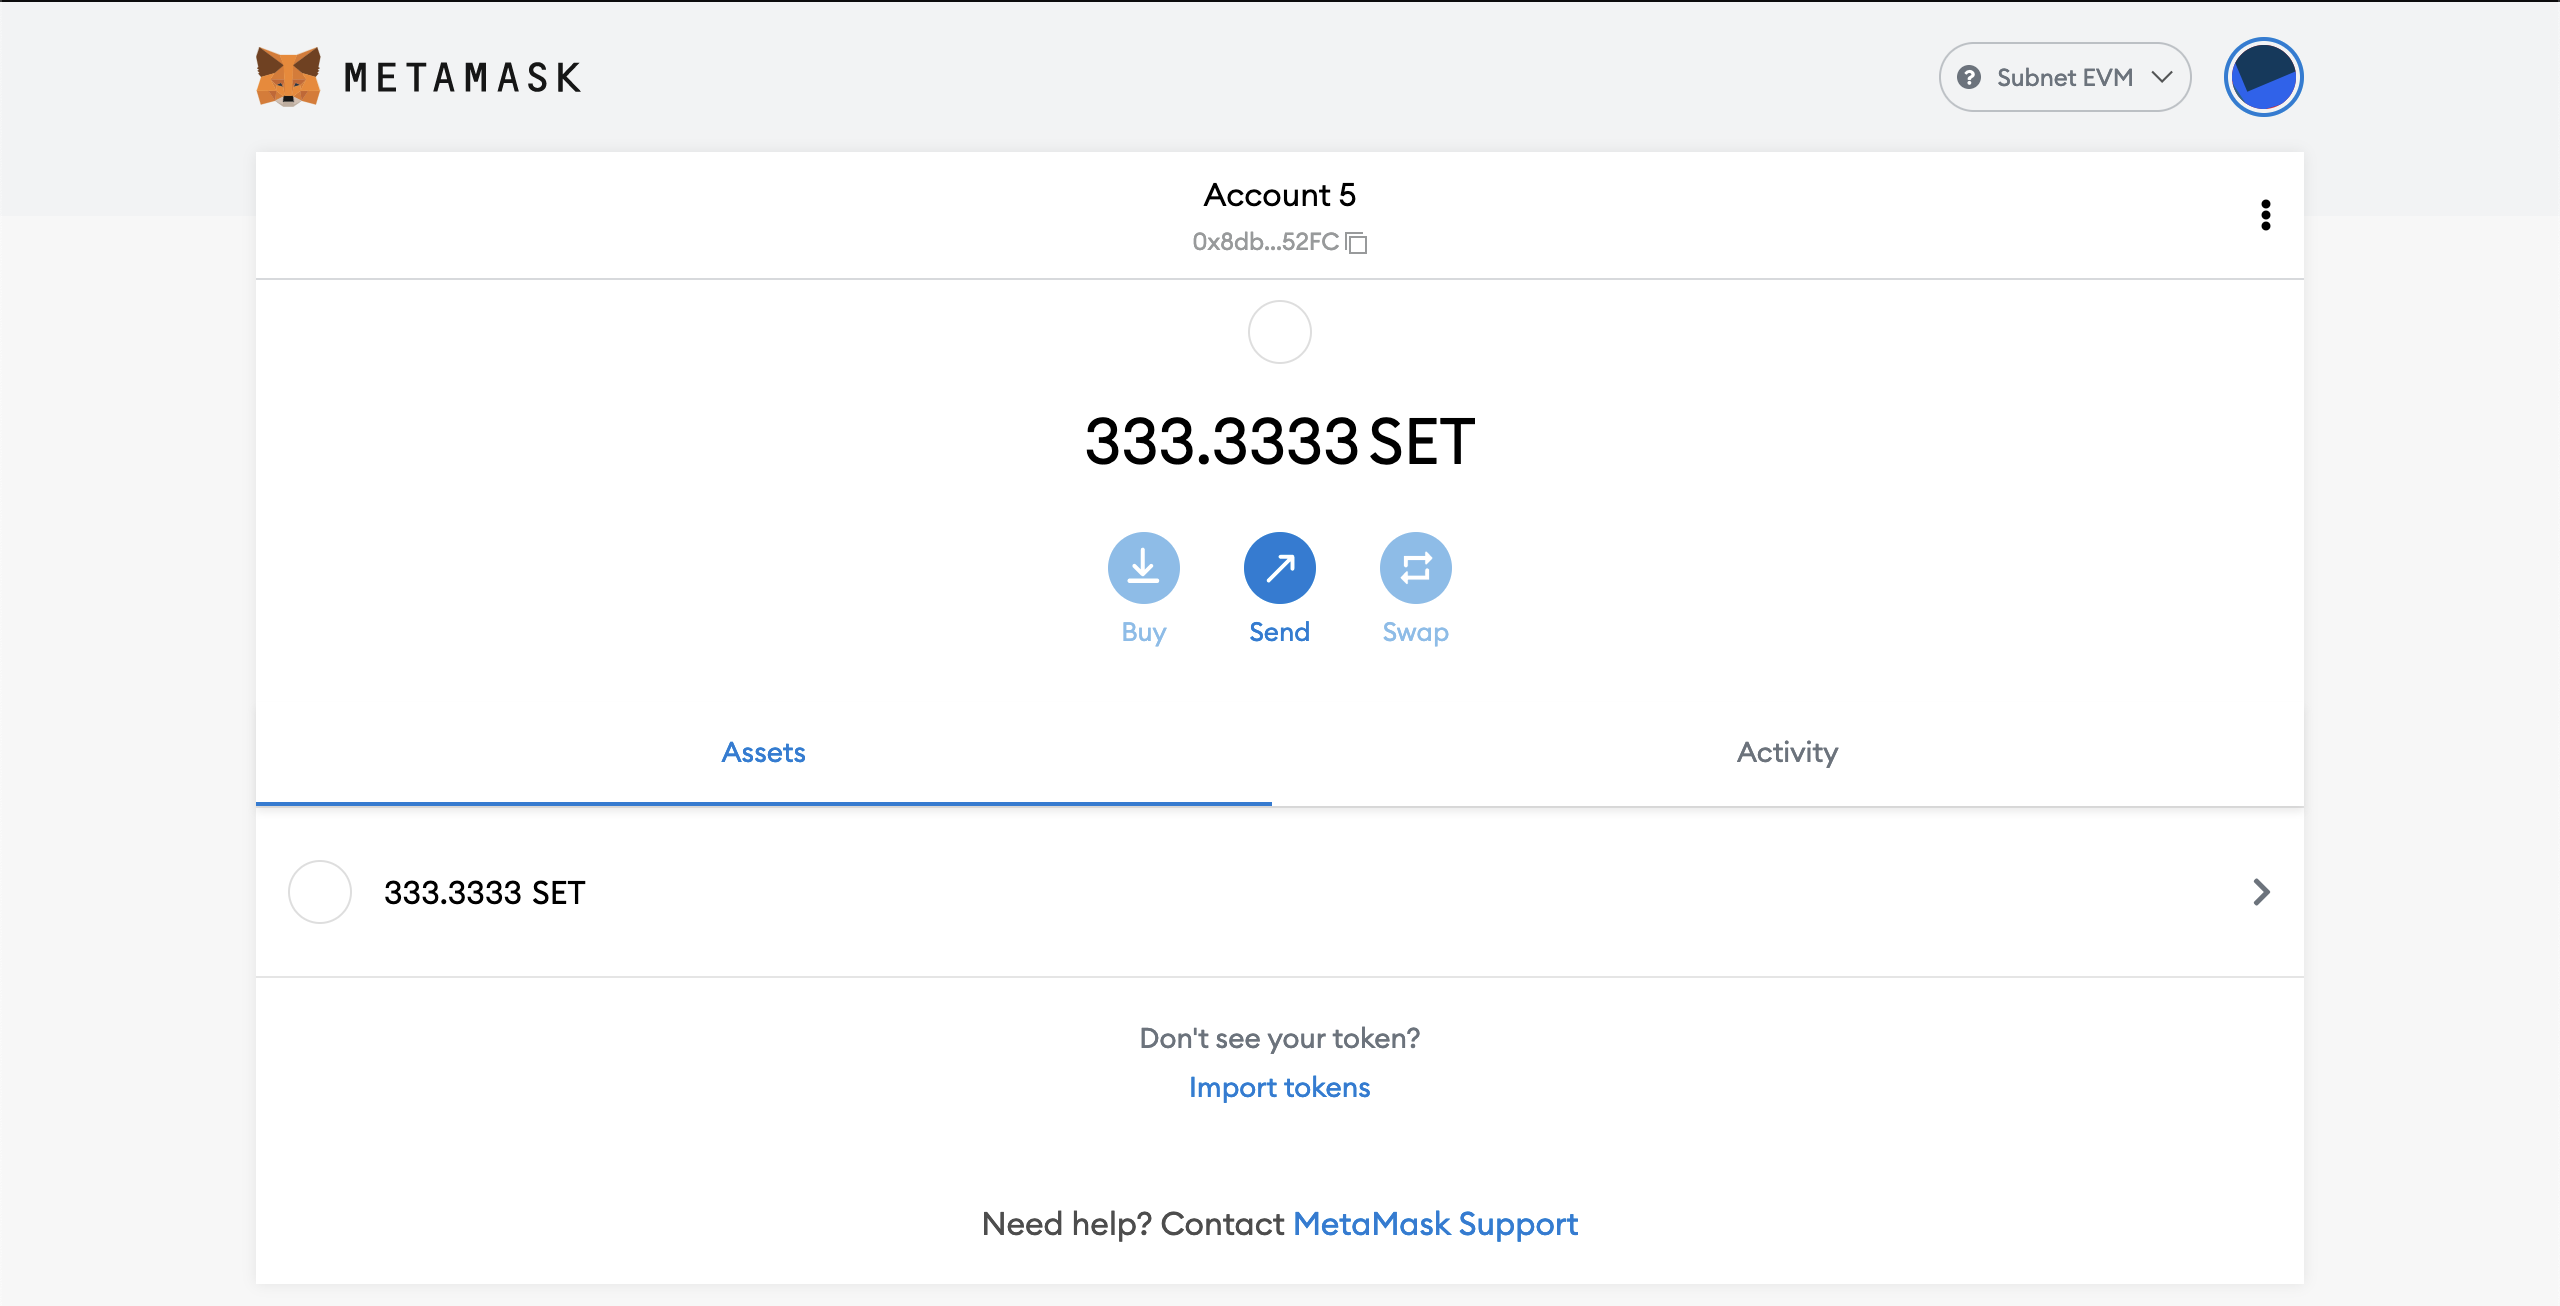
Now we can access our account with initial balance. We used 0x8db97C7cEcE249c2b98bDC0226Cc4C2A57BF52FC as our initial account. The private key of this account is 56289e99c94b6912bfc12adc093c9b51124f0dc54ac7a766b2bc5ccf558d8027. This private key is publicly shared, so don't use this account in mainnet or testnets. The genesis block allocates 333,333,333,333,333,333,333 coins to this account, which is equivalent to 333.3333 SET.
Let's import this private key into Metamask.
- Click on Metamask.
- From "My Accounts" click on "Import Account":
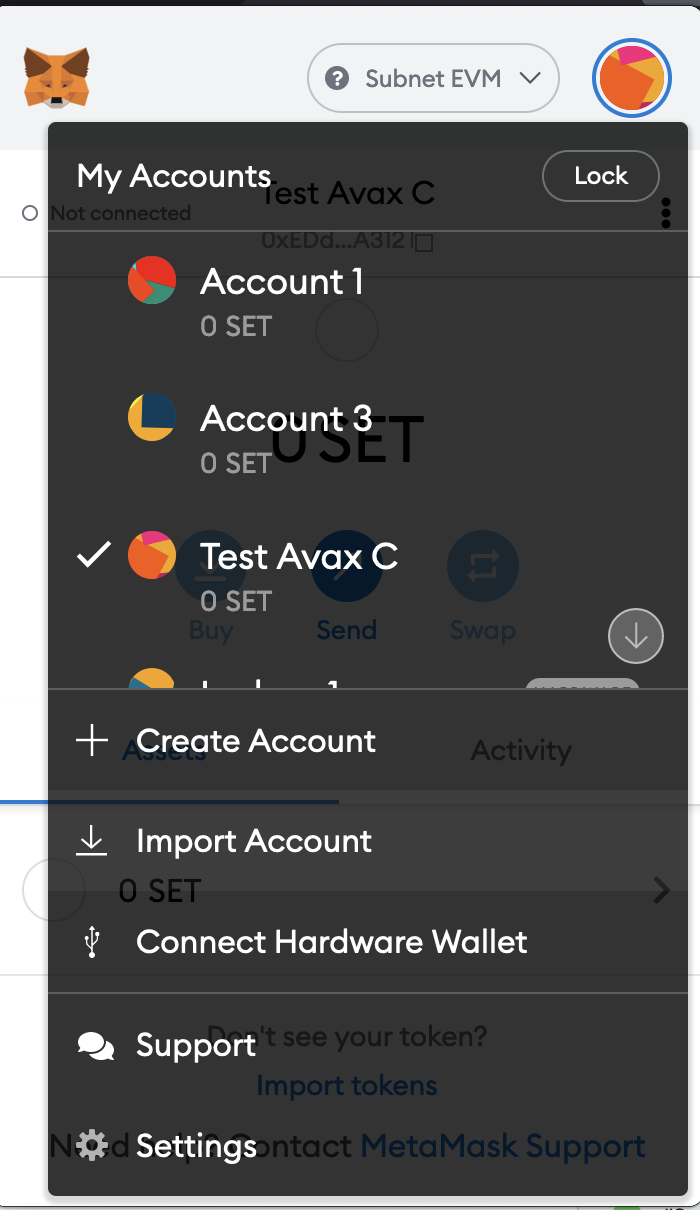
Now you can import your private key in this screen. When you pasted your private key, click on "Import". You should be able to see your account with some balances in it. For example:
Now we can send funds to another account:
- Click on "Send" in your Metamask.
- Input an address or select "Transfer between my accounts"
- Select an address
- Input your amount. It should be look like this
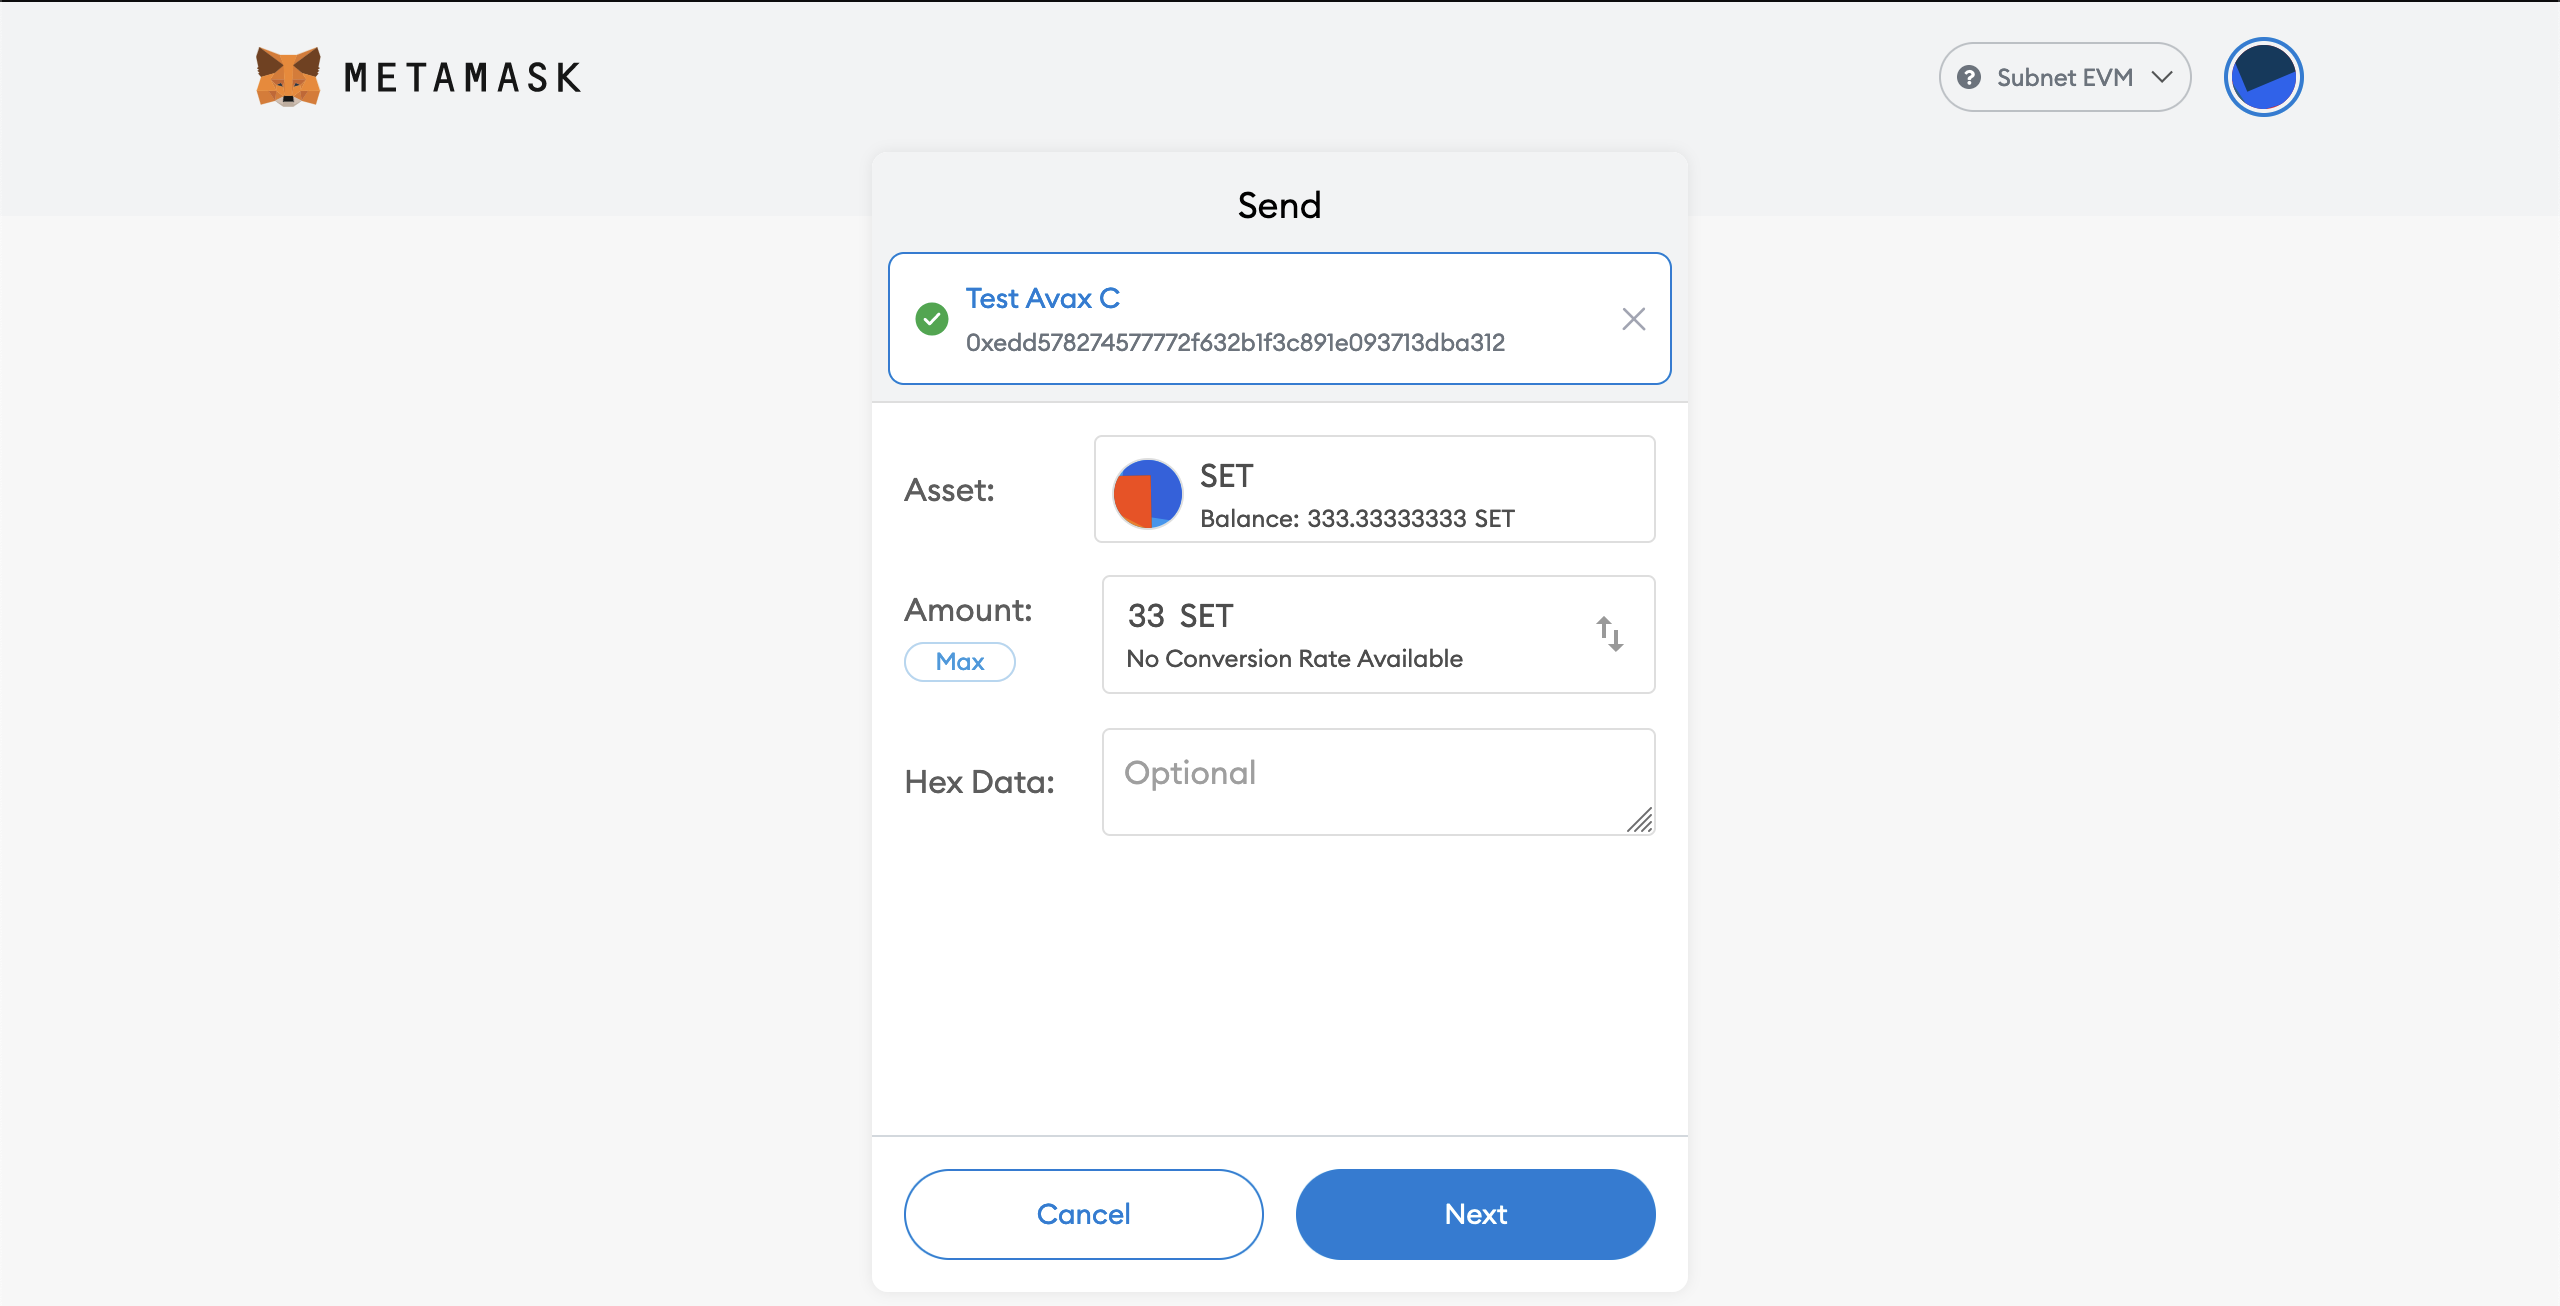
- Click on Next
- You can inspect your transaction in this screen:
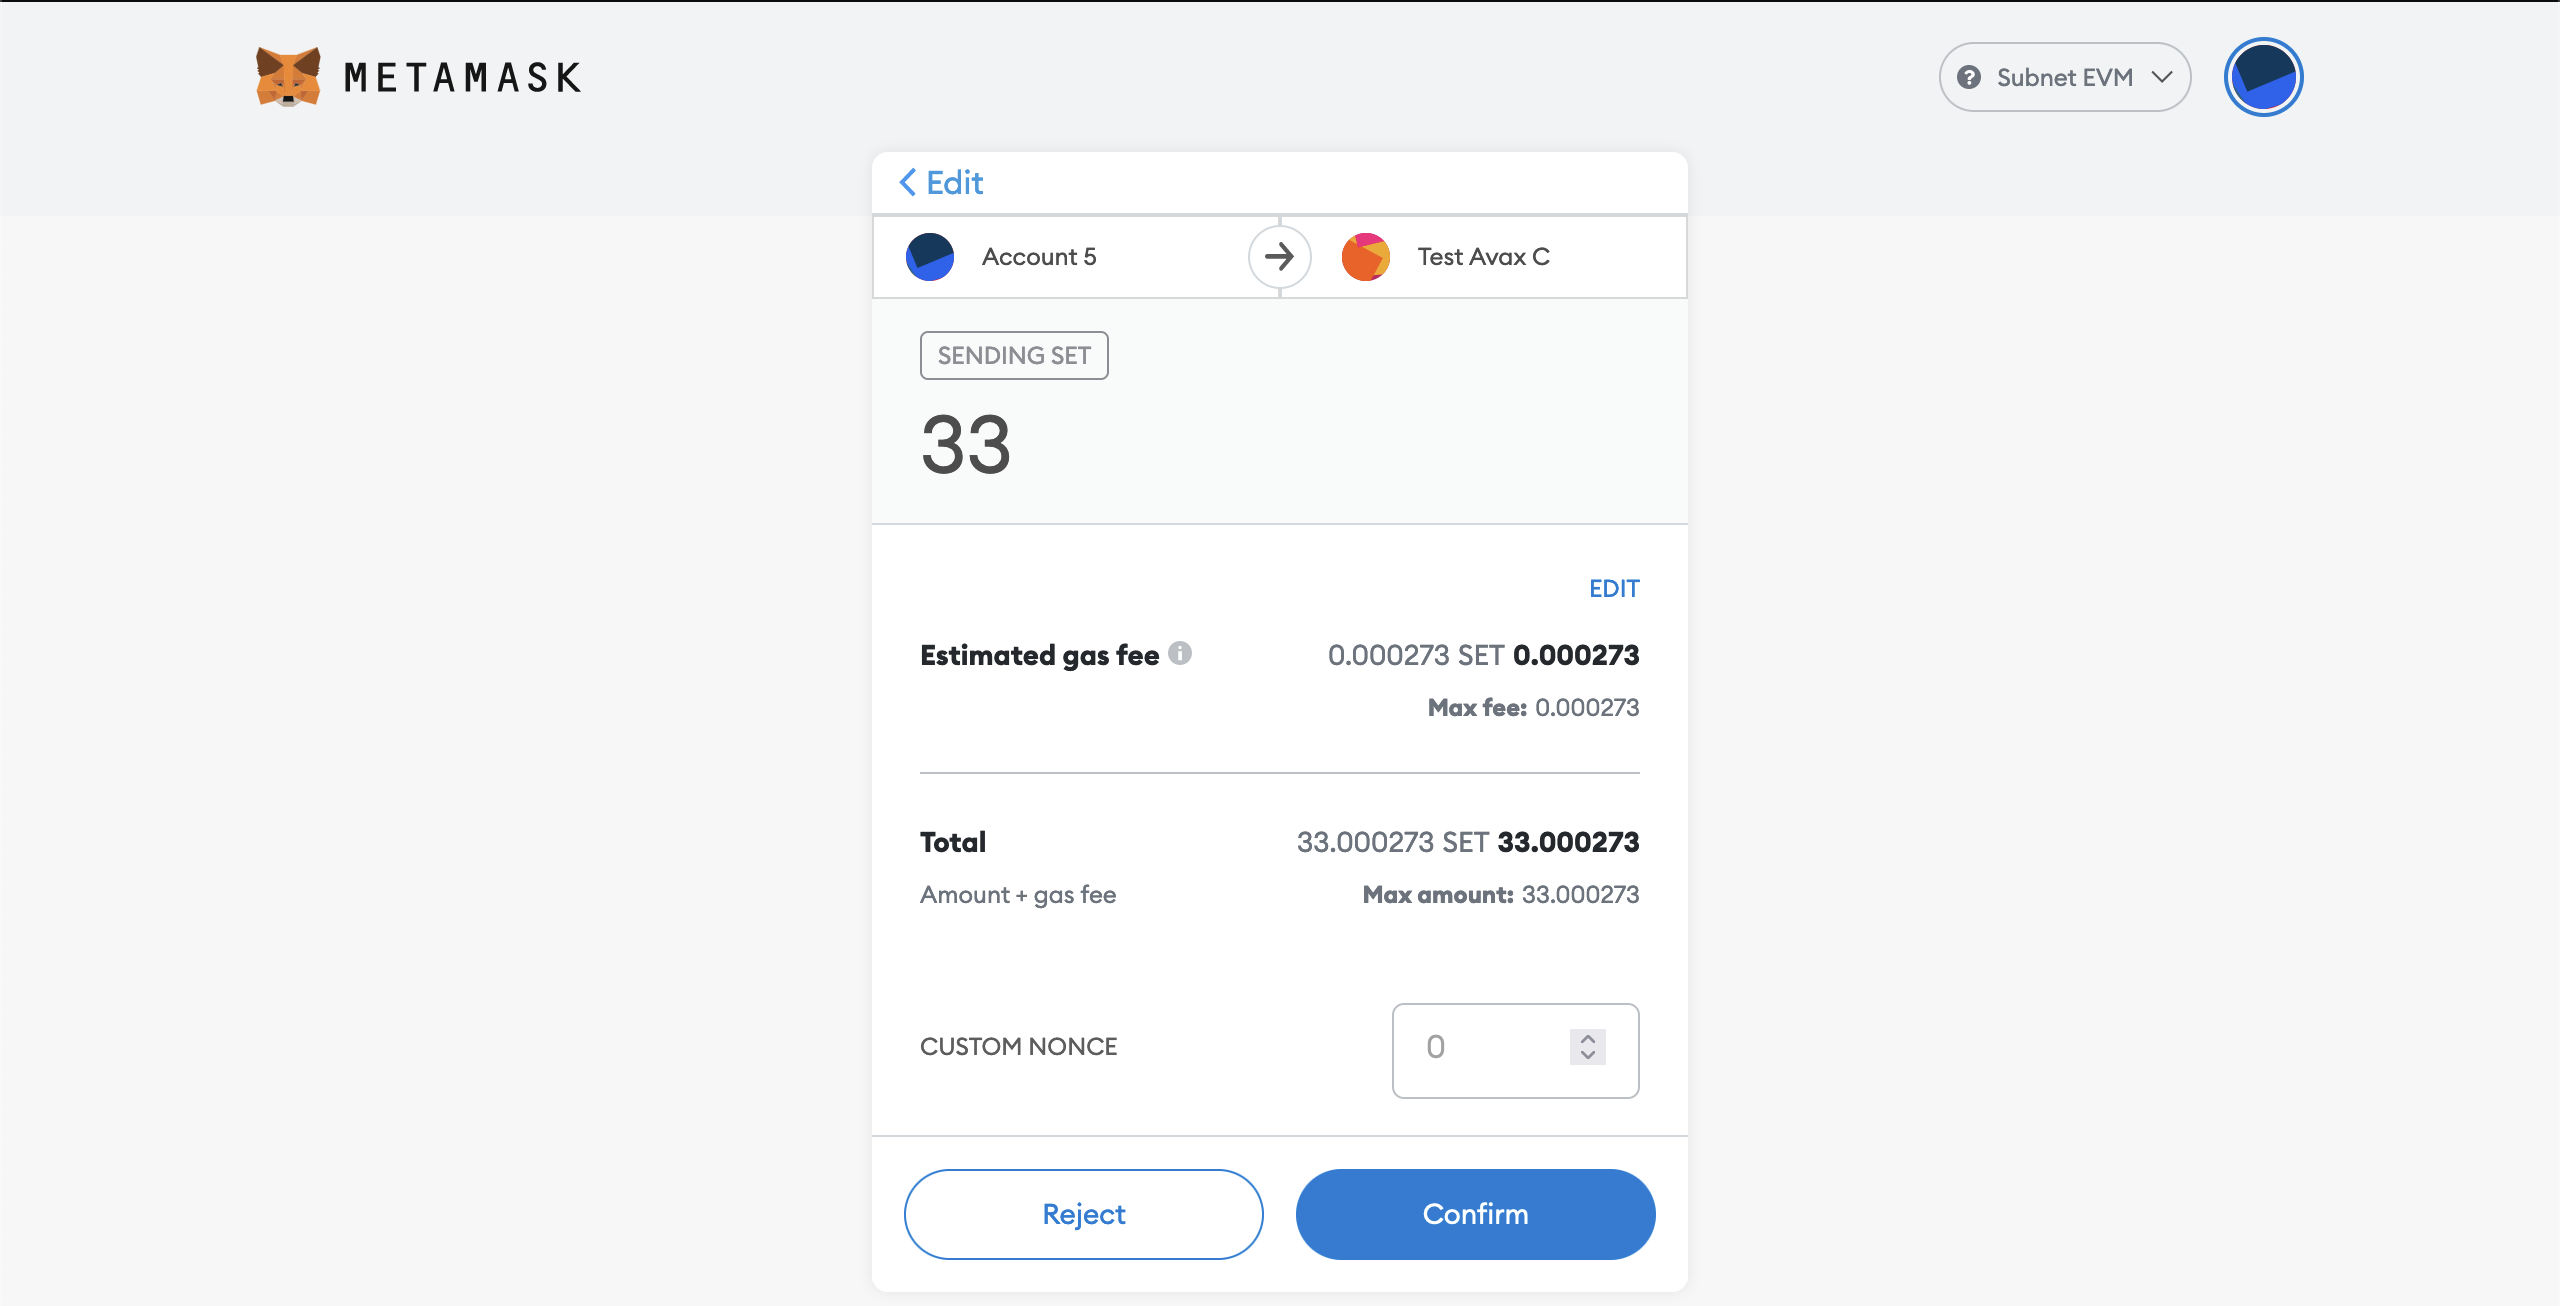
For example let's verify the base fee is indeed the configured one. Remind that in our genesis we specified minBaseFee as 13000000000 which is equivalent to 13 Gwei. Let's click "Edit" above on the "Estimated gas fee" section.
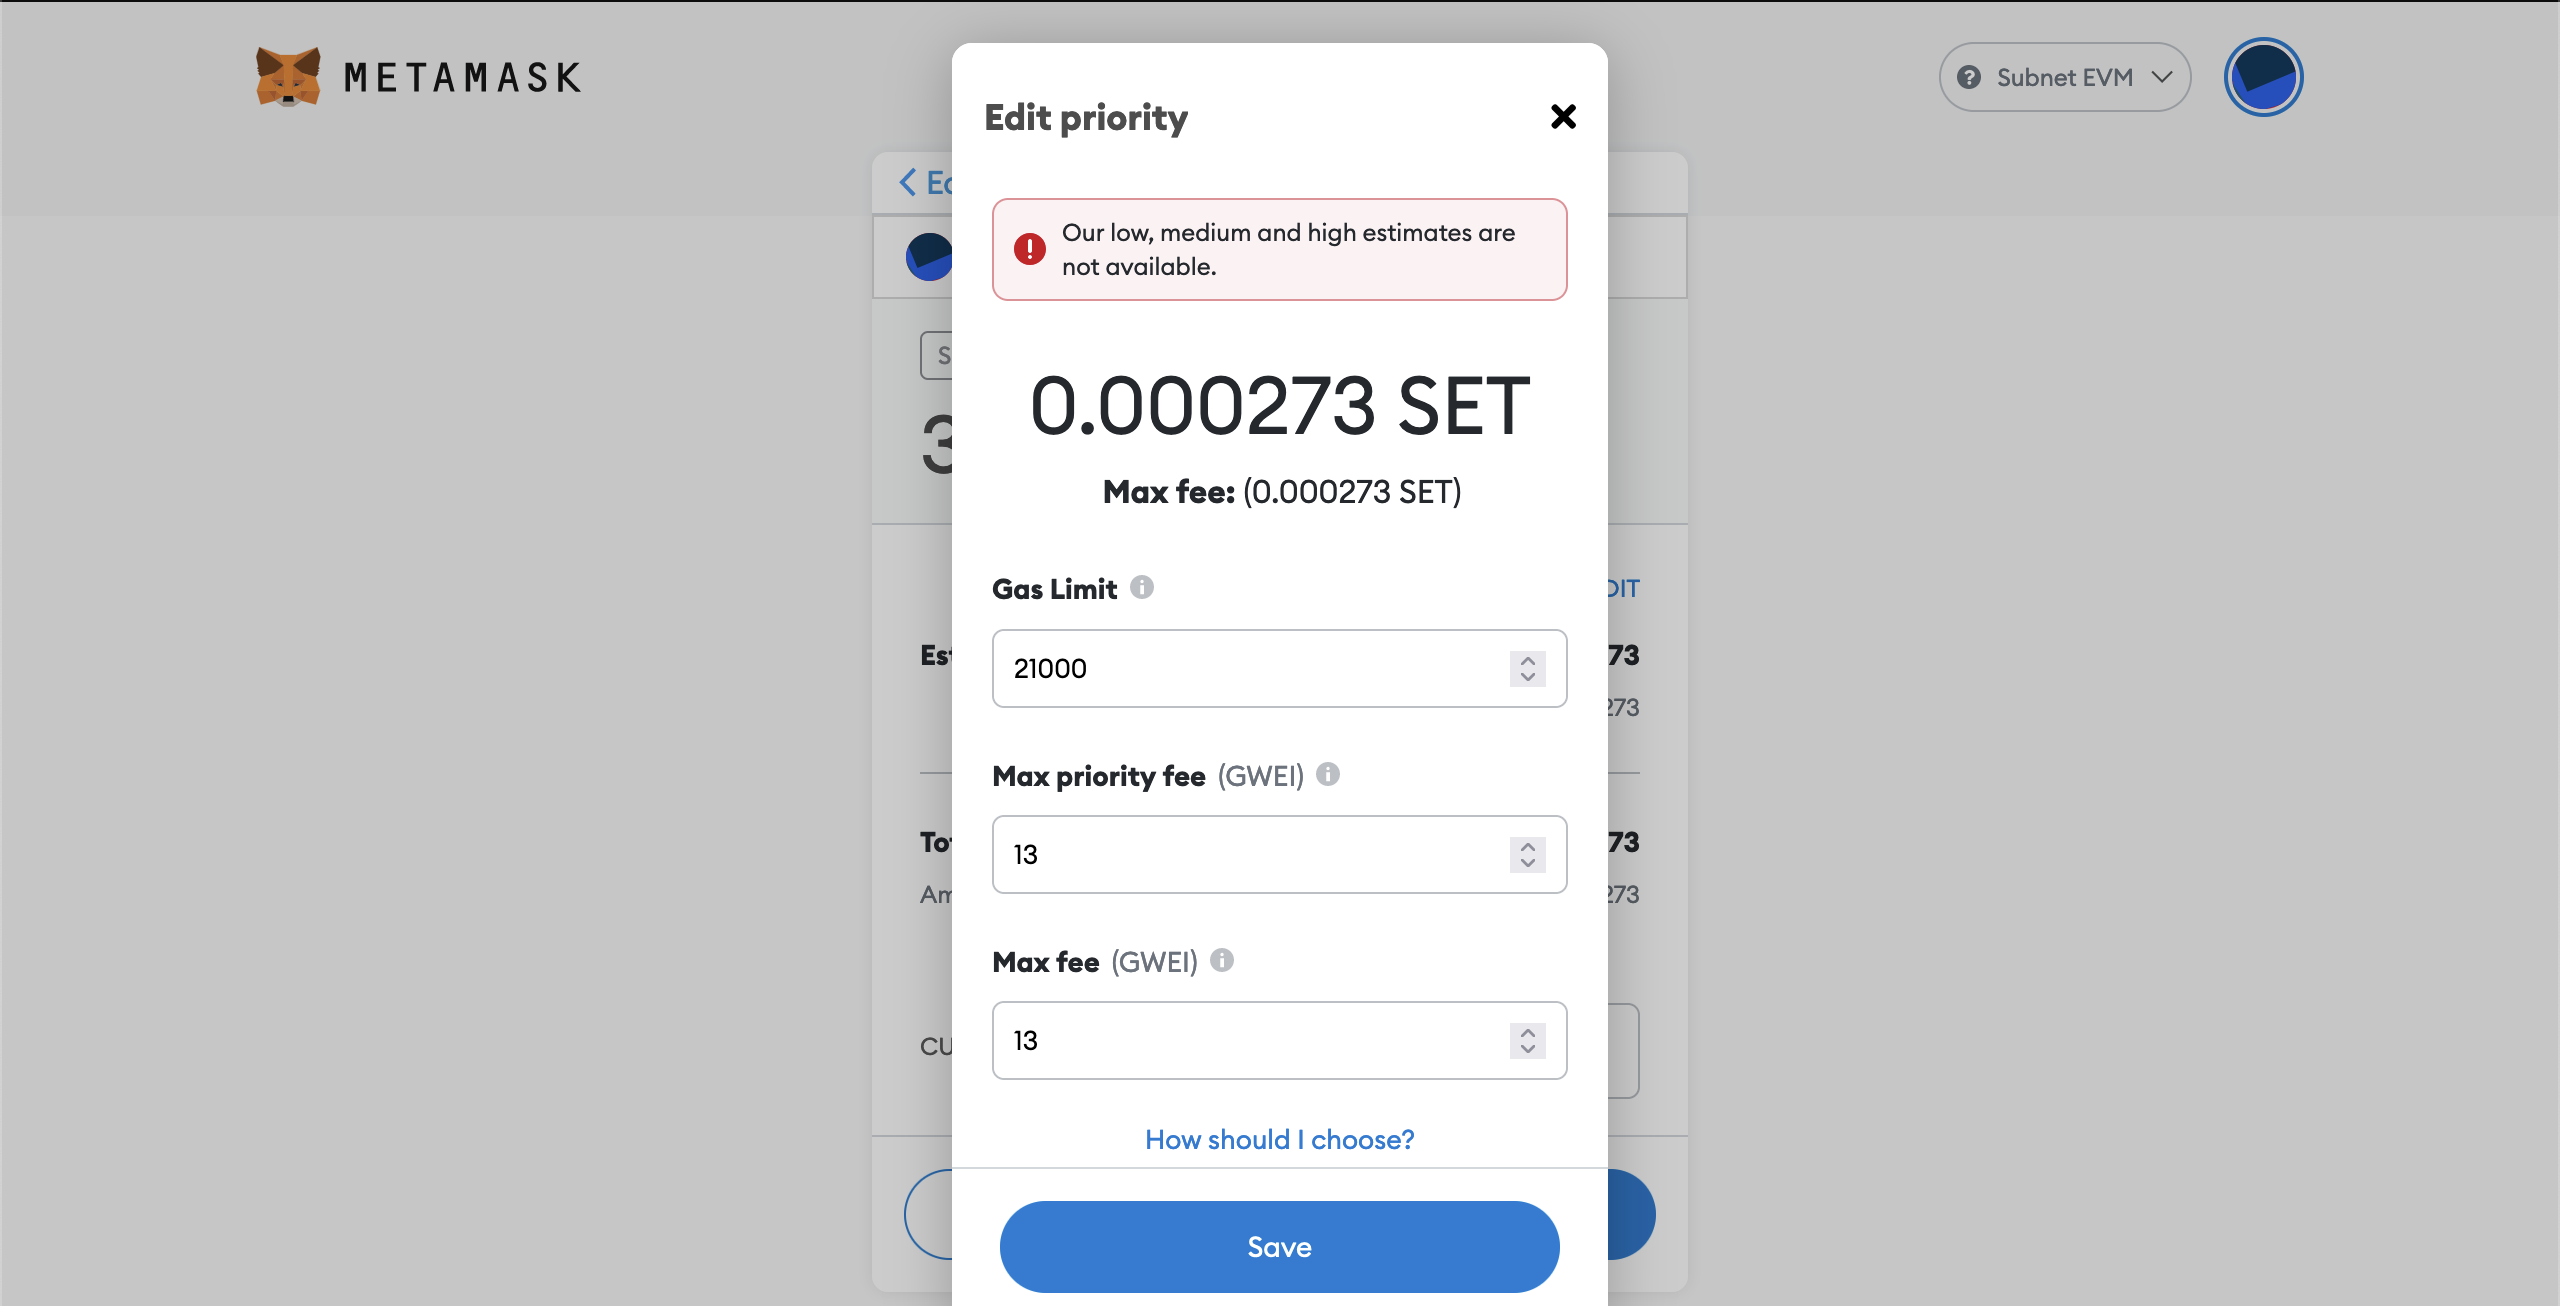
- Click on "Save" in the "Edit priority" dialog when you're done.
- Now we can confirm our transaction. Click on "Confirm"
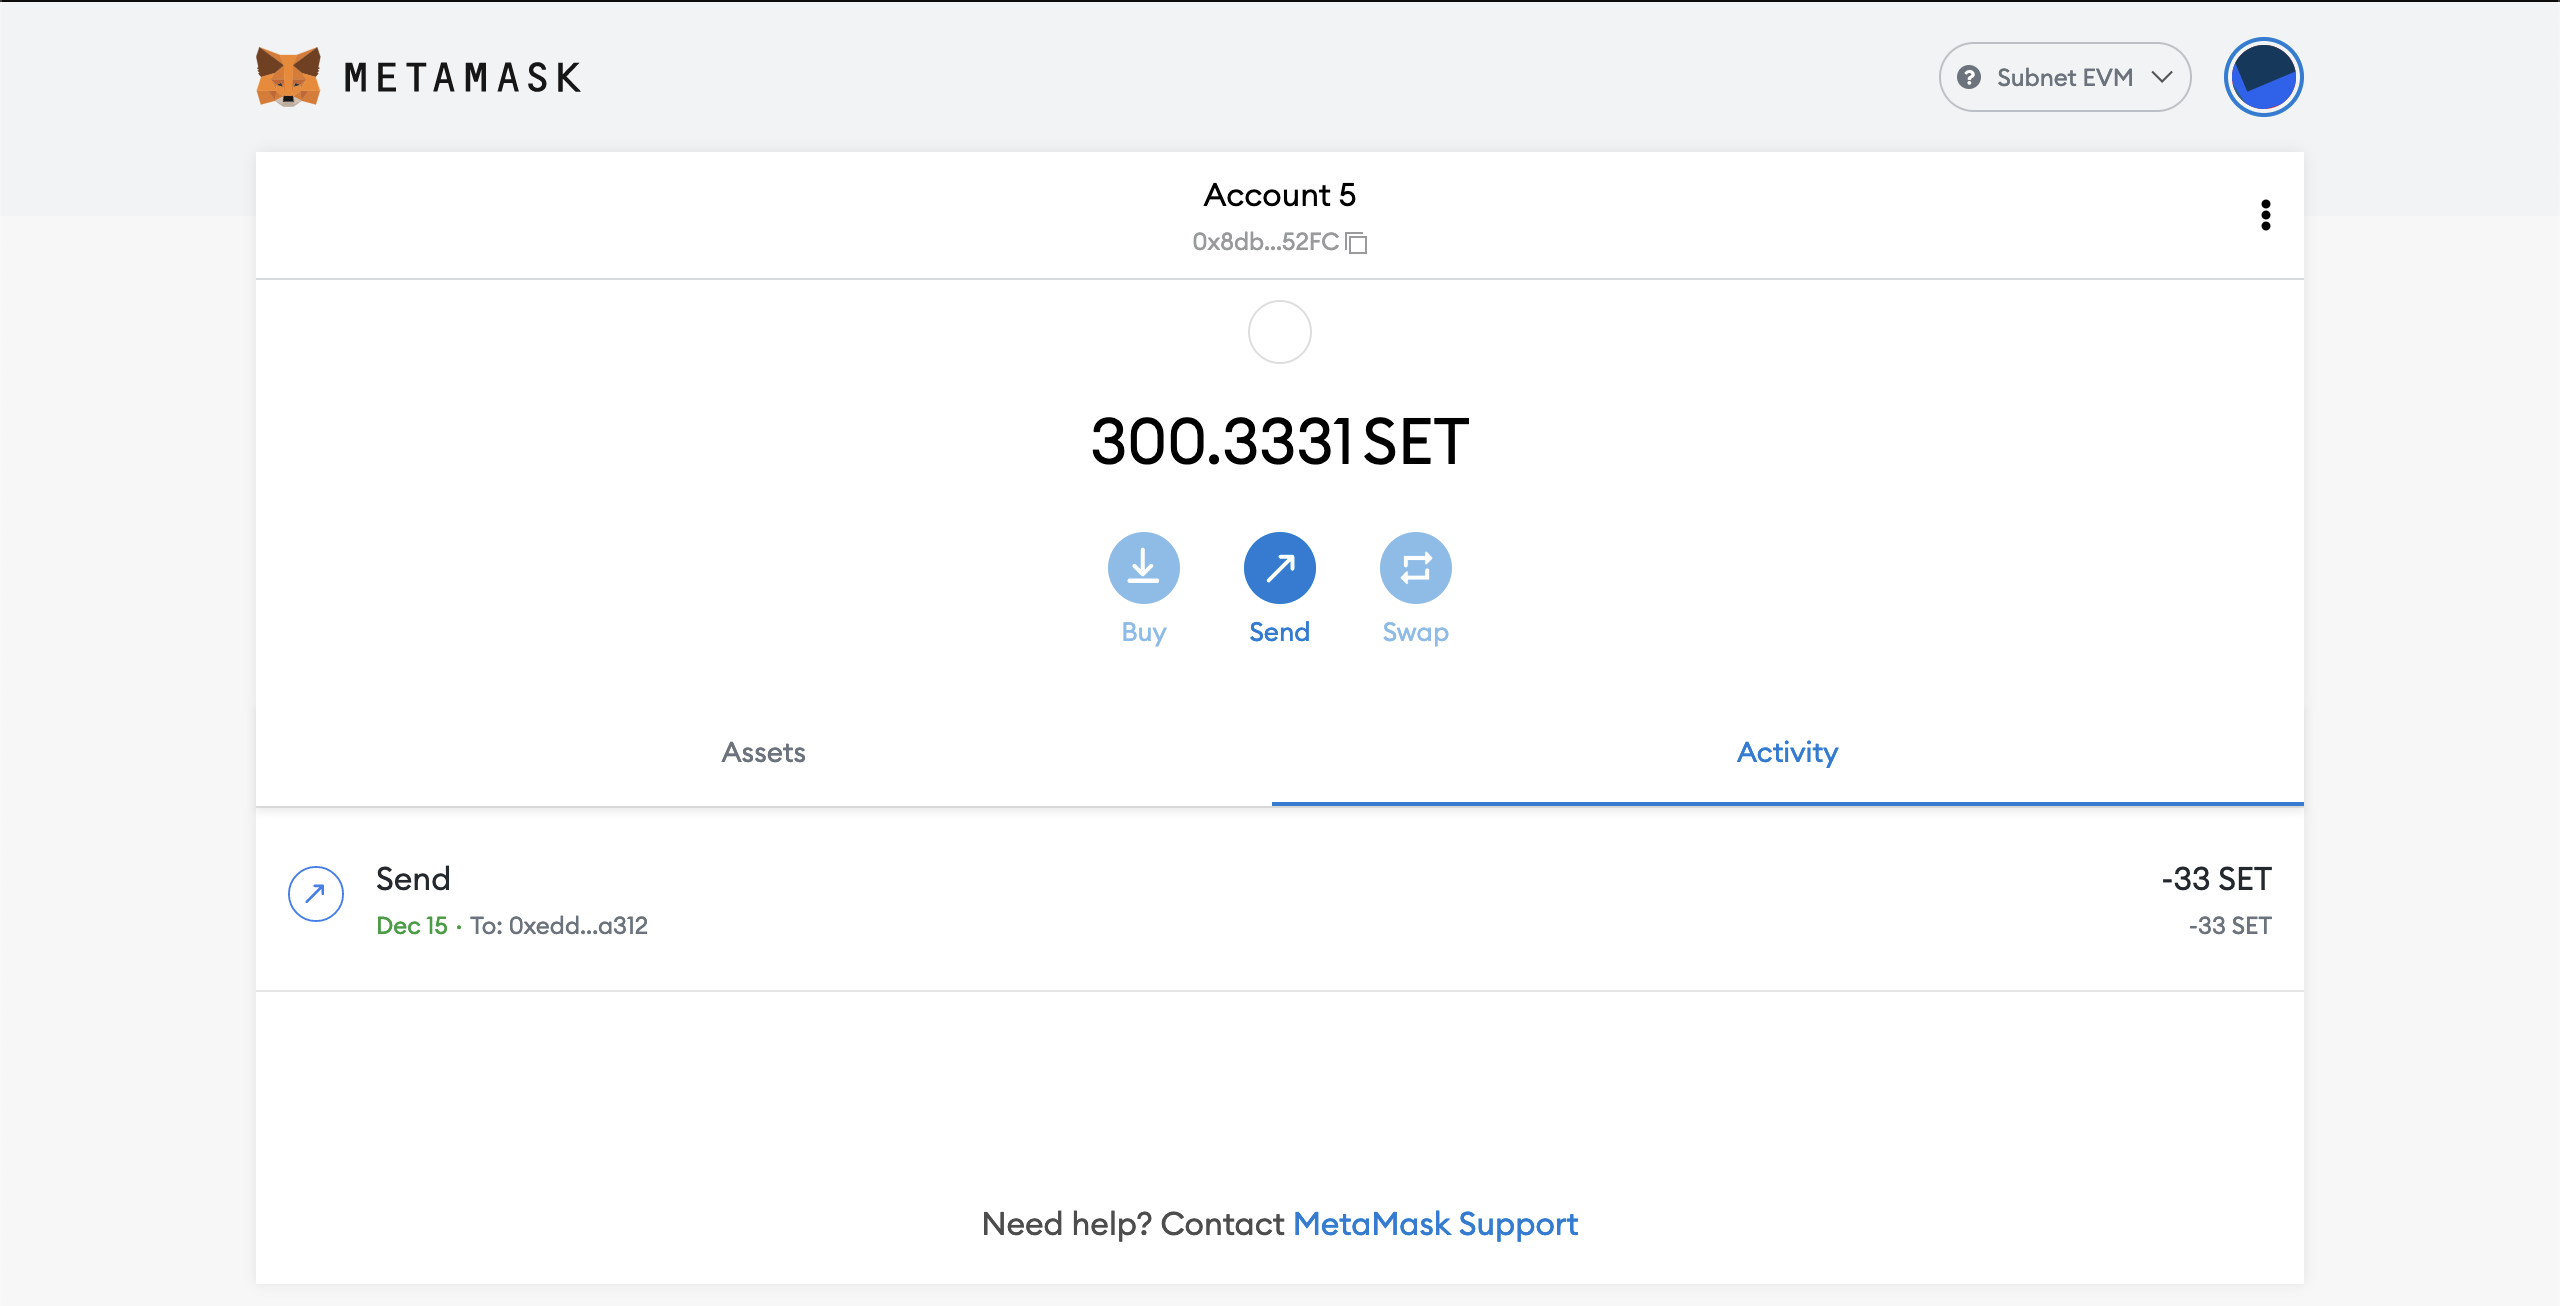
- After a while your transaction will be confirmed. When confirmed it should look like this:
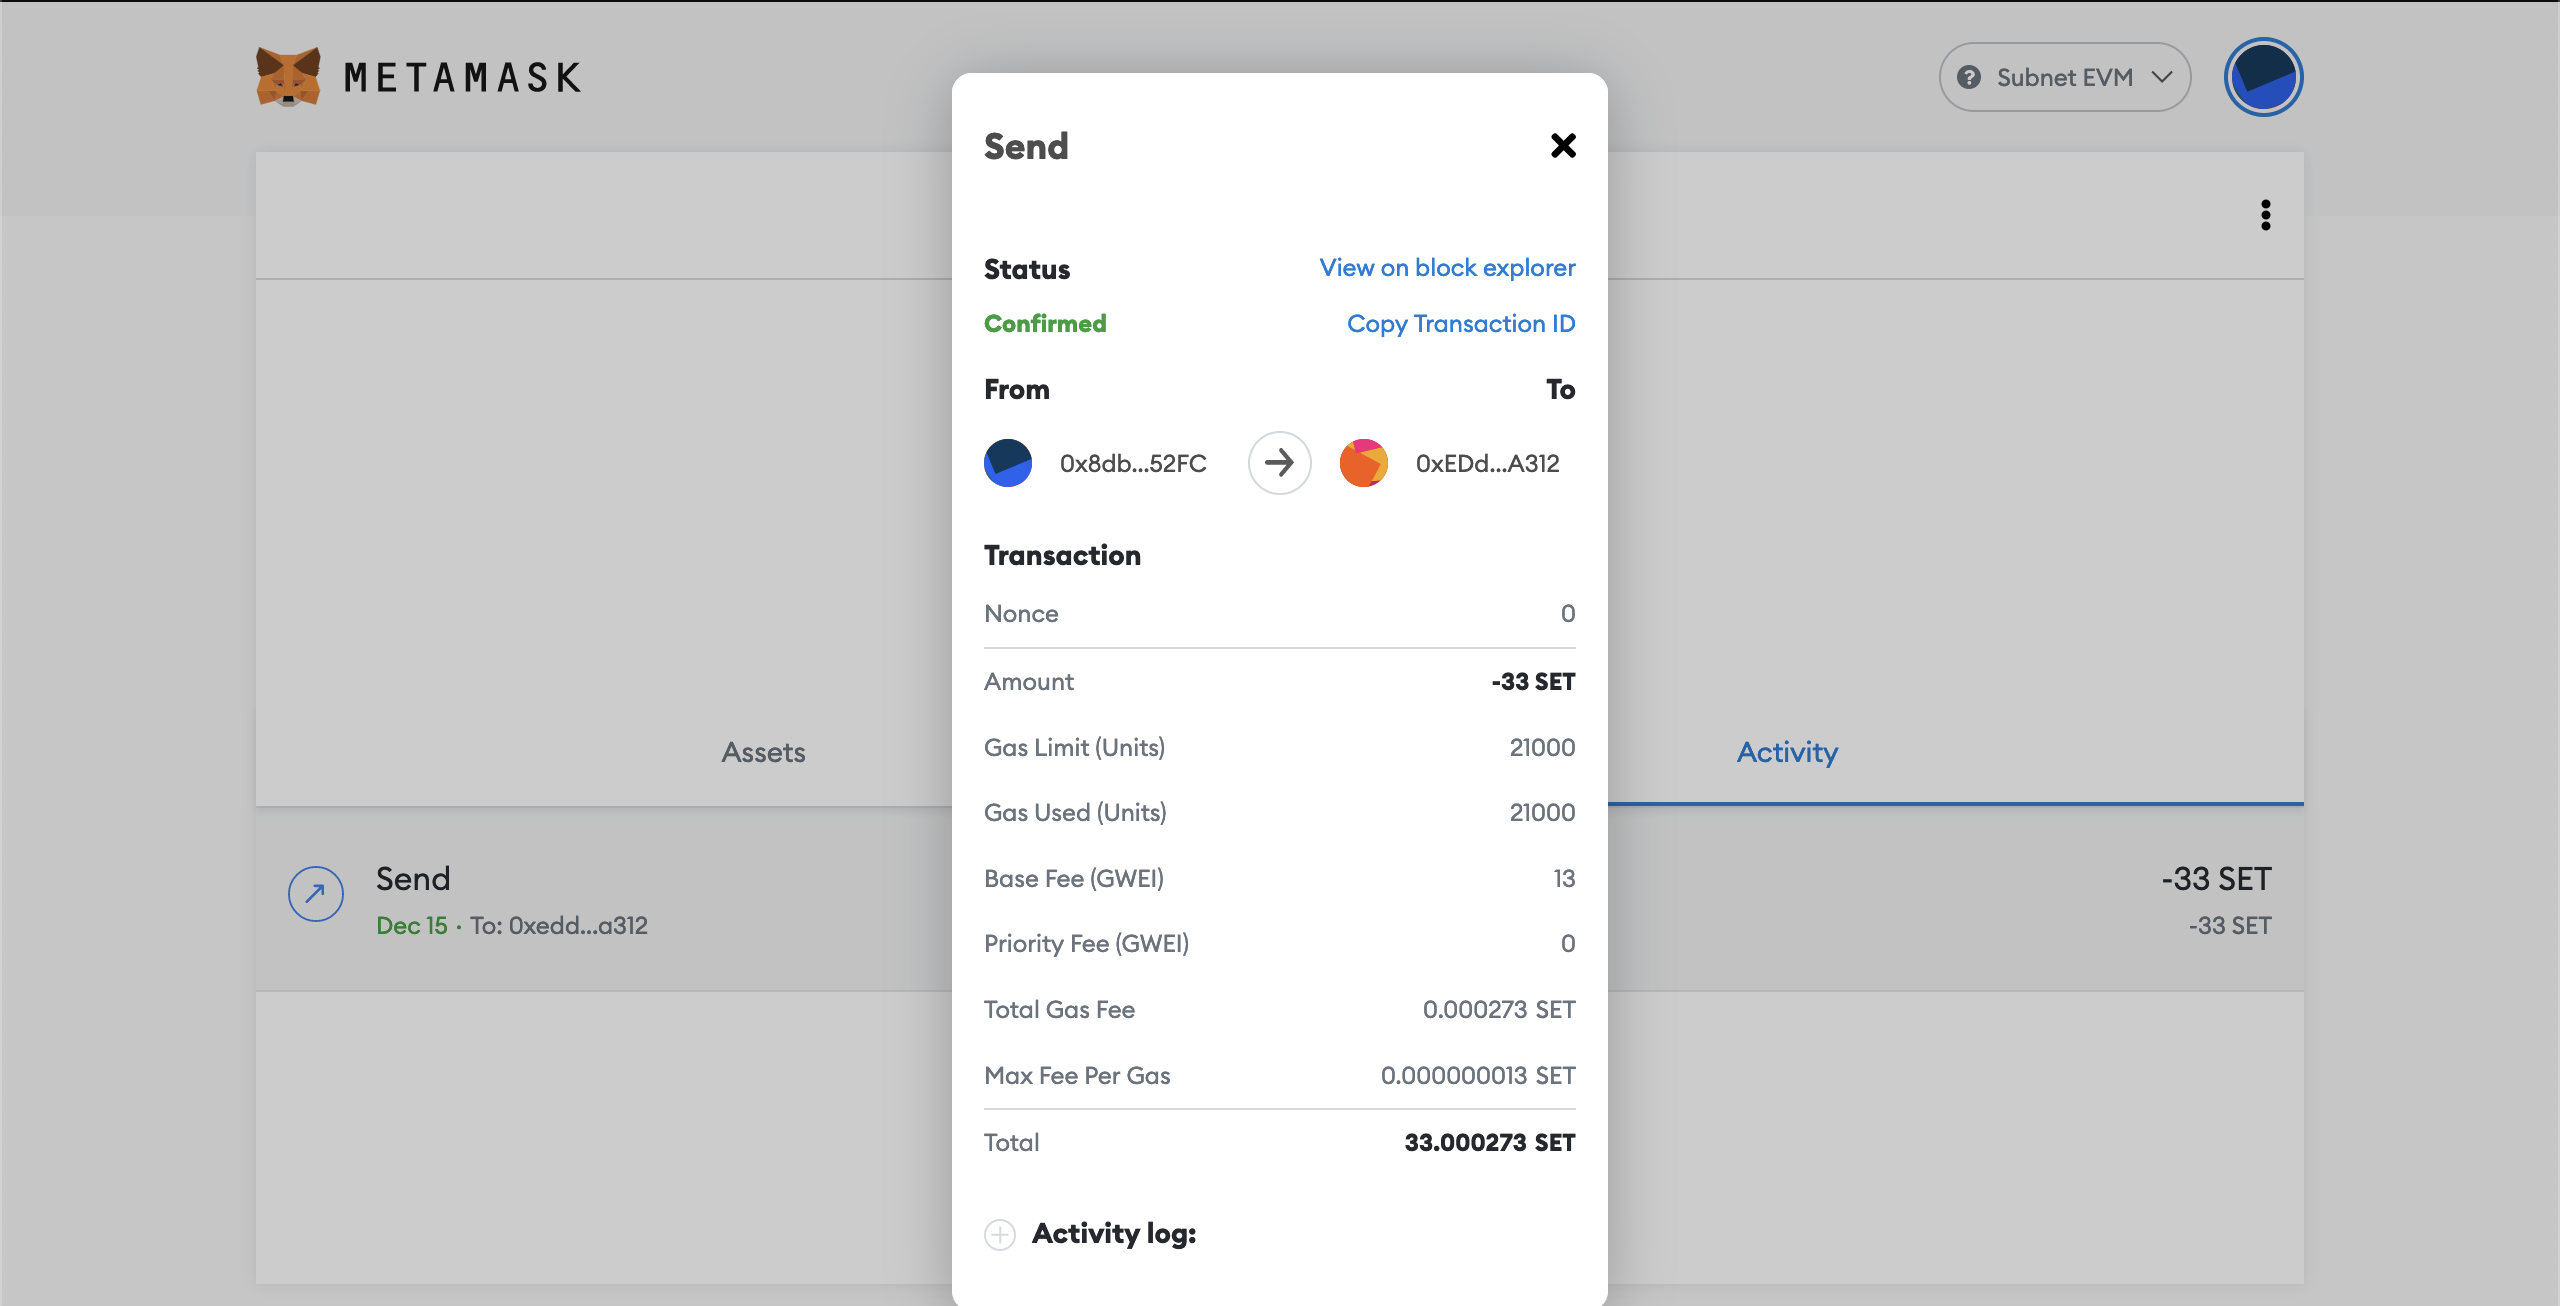
You can inspect your confirmed transaction.
Other Tools
You can use Subnet EVM just like you use C-Chain and EVM tools. Only differences are chainID and RPC URL. For example you can deploy your contracts with hardhat quick starter by changing url and chainId in the hardhat.config.ts.