Create a chat dApp using Solidity and ReactJS
Introduction
In this tutorial we will build a decentralized chat application on Avalanche's Fuji test-network from scratch. The dApp will allow users to connect with other people and chat with them. We will develop our smart contract using Solidity which will be deployed on Avalanche's C-chain. We will have a basic, easy-to-use UI developed using ReactJS. So, let us begin!
Requirements
- Basic familiarity with ReactJS and Solidity
- Node.js v10.18.0+
- Metamask extension on your browser
Implementing the smart contract
Our chat dApp needs the basic functionality allowing users to connect with and share messages with friends. To accomplish this, we will write the functions responsible for creating an account, adding friends and sending messages.
Account creation
We will define 3 functions :
The
checkUserExists(pubkey)function is used to check if a user is registered with our application or not. It will help make sure duplicate users are not created and it will also be called from other functions to check their existence.The
createAccount(username)function registers a new user on the platform with the provided username.The
getUsername(pubkey)function will return the username of the given user if it exists.
Adding friends
Here also we will define 3 functions :
The
checkAlreadyFriends(pubkey1, pubkey2)function checks whether two users are already friends with each other or not. This is needed to prevent duplicate channel between the same parties and will also be used to prevent a user from sending messages to other users unless they are friends.The
addFriend(pubkey, name)function mark the two users as friend if they both are registered on the platform and are already not friends with each other.The
getMyFriendList()function will return an array of friends of the given user.
Messaging
The final part of the Solidity contract will enable the exchange of messages between users. We will divide the task into two functions sendMessage() and readMessage().
The
sendMessage()function allows a user to send messages to another registered user (friend). This is done withcheckUserExists(pubkey)andcheckAlreadyFriends(pubkey1, pubkey2).The
readMessage()function returns the chat history that has happened between the two users so far.
User Data Collections
We will have three types of user-defined data :
userwill have the propertiesnamewhich stores the username, andfriendListwhich is an array of other users.friendwill have the propertiespubkeywhich is the friends' public address, andnamewhich the user would like to refer them as.messagehas three properties:sender,timestampandmsg, which is short for "message".
We would maintain 2 collections in our database:
userListwhere all the users on the platform are mapped with their public address.allMessagesstores the messages. As Solidity does not allow user-defined keys in a mapping, we can instead hash the public keys of the two users. This value can then be stored in the mapping.
Deploying the smart contract
Setting up Metamask
Log in to MetaMask -> Click the Network drop-down -> Select Custom RPC
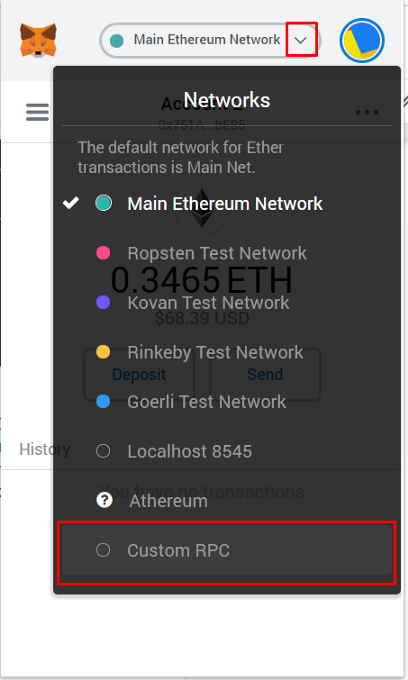
FUJI Testnet Settings:
- Network Name: Avalanche FUJI C-Chain
- New RPC URL: https://api.avax-test.network/ext/bc/C/rpc
- ChainID:
43113 - Symbol:
C-AVAX - Explorer: https://testnet.snowtrace.io
Fund your address from the given faucet.
Deploy using Remix
Open Remix -> Select Solidity
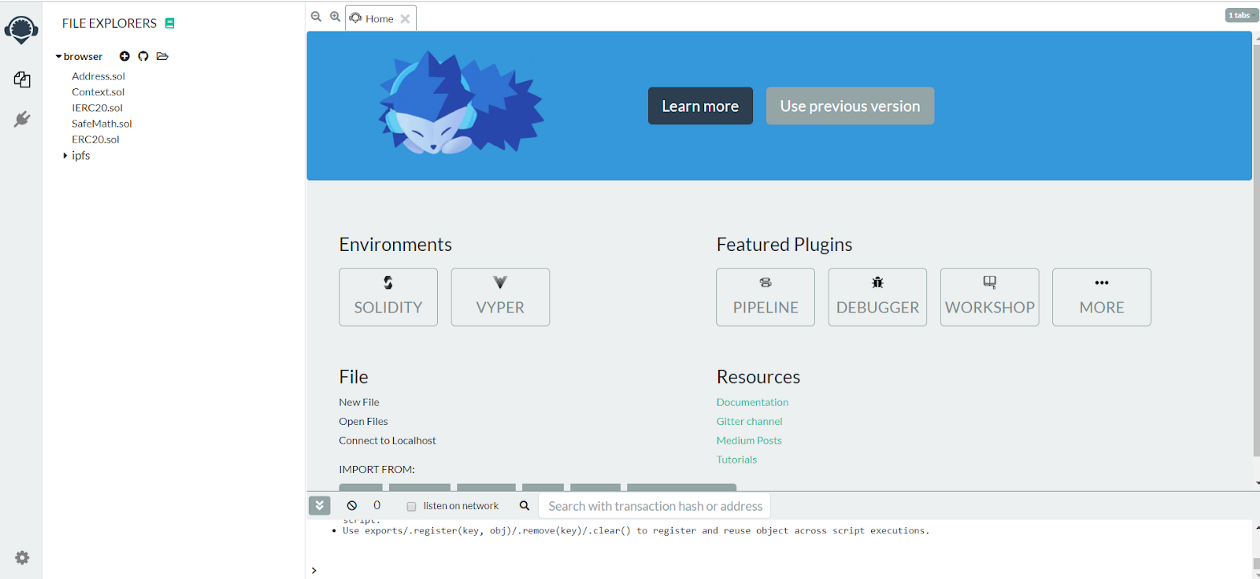
Create a Database.sol file in the Remix file explorer, and paste the following code :
// SPDX-License-Identifier: GPL-3.0

pragma solidity >=0.7.0 <0.9.0;

contract Database {

    // Stores the default name of an user and her friends info
    struct user {
        string name;
        friend[] friendList;
    }

    // Each friend is identified by its address and name assigned by the second party
    struct friend {
        address pubkey;
        string name;
    }

    // message construct stores the single chat message and its metadata
    struct message {
        address sender;
        uint256 timestamp;
        string msg;
    }

    // Collection of users registered on the application
    mapping(address => user) userList;
    // Collection of messages communicated in a channel between two users
    mapping(bytes32 => message[]) allMessages; // key : Hash(user1,user2)

    // It checks whether a user(identified by its public key)
    // has created an account on this application or not
    function checkUserExists(address pubkey) public view returns(bool) {
        return bytes(userList[pubkey].name).length > 0;
    }

    // Registers the caller(msg.sender) to our app with a non-empty username
    function createAccount(string calldata name) external {
        require(checkUserExists(msg.sender)==false, "User already exists!");
        require(bytes(name).length>0, "Username cannot be empty!");
        userList[msg.sender].name = name;
    }

    // Returns the default name provided by an user
    function getUsername(address pubkey) external view returns(string memory) {
        require(checkUserExists(pubkey), "User is not registered!");
        return userList[pubkey].name;
    }

    // Adds new user as your friend with an associated nickname
    function addFriend(address friend_key, string calldata name) external {
        require(checkUserExists(msg.sender), "Create an account first!");
        require(checkUserExists(friend_key), "User is not registered!");
        require(msg.sender!=friend_key, "Users cannot add themselves as friends!");
        require(checkAlreadyFriends(msg.sender,friend_key)==false, "These users are already friends!");

        _addFriend(msg.sender, friend_key, name);
        _addFriend(friend_key, msg.sender, userList[msg.sender].name);
    }

    // Checks if two users are already friends or not
    function checkAlreadyFriends(address pubkey1, address pubkey2) internal view returns(bool) {

        if(userList[pubkey1].friendList.length > userList[pubkey2].friendList.length)
        {
            address tmp = pubkey1;
            pubkey1 = pubkey2;
            pubkey2 = tmp;
        }

        for(uint i=0; i<userList[pubkey1].friendList.length; ++i)
        {
            if(userList[pubkey1].friendList[i].pubkey == pubkey2)
                return true;
        }
        return false;
    }

    // A helper function to update the friendList
    function _addFriend(address me, address friend_key, string memory name) internal {
        friend memory newFriend = friend(friend_key,name);
        userList[me].friendList.push(newFriend);
    }

    // Returns list of friends of the sender
    function getMyFriendList() external view returns(friend[] memory) {
        return userList[msg.sender].friendList;
    }

    // Returns a unique code for the channel created between the two users
    // Hash(key1,key2) where key1 is lexicographically smaller than key2
    function _getChatCode(address pubkey1, address pubkey2) internal pure returns(bytes32) {
        if(pubkey1 < pubkey2)
            return keccak256(abi.encodePacked(pubkey1, pubkey2));
        else
            return keccak256(abi.encodePacked(pubkey2, pubkey1));
    }

    // Sends a new message to a given friend
    function sendMessage(address friend_key, string calldata _msg) external {
        require(checkUserExists(msg.sender), "Create an account first!");
        require(checkUserExists(friend_key), "User is not registered!");
        require(checkAlreadyFriends(msg.sender,friend_key), "You are not friends with the given user");

        bytes32 chatCode = _getChatCode(msg.sender, friend_key);
        message memory newMsg = message(msg.sender, block.timestamp, _msg);
        allMessages[chatCode].push(newMsg);
    }

    // Returns all the chat messages communicated in a channel
    function readMessage(address friend_key) external view returns(message[] memory) {
        bytes32 chatCode = _getChatCode(msg.sender, friend_key);
        return allMessages[chatCode];
    }
}
Navigate to the Solidity compiler Tab on the left side navigation bar and click the blue button to compile the Database.sol contract. Note down the ABI as it will be required in the next section.
Navigate to Deploy Tab and open the “ENVIRONMENT” drop-down. Select "Injected Web3" (make sure Metamask is loaded) and click "Deploy" button.
Approve the transaction on Metamask pop-up interface. Once our contract is deployed successfully, Note down the contract address.
An Application Binary Interface (ABI) is a JSON object which stores the metadata about the methods of a contract like data type of input parameters, return data type & property of the method like payable, view, pure etc. You can learn more about the ABI from the solidity documentation
Creating a frontend in React
Now, we are going to create a React app scaffold and set up the frontend of the application.
Open a terminal and navigate to the directory where we will create the application.
cd /path/to/directory
Now use npm to install create-react-app. -g flag denotes that the package should be installed globally.
npm install -g create-react-app
Create a new react app.
create-react-app avalanche-chat-app
Move to the newly created directory and install the given dependencies.
cd avalanche-chat-app
npm install --save [email protected] [email protected] [email protected]
Open index.html file in the public directory, and paste the following HTML :
<!DOCTYPE html>
<html lang="en">

<head>
    <meta charset="utf-8" />
    <meta name="viewport" content="width=device-width, initial-scale=1" />
    <meta name="theme-color" content="#000000" />
    <title>Chat dApp</title>
</head>

<body>
    <div id="root"></div>
</body>

</html>
Move out of the public directory and create a new directory components inside src directory, where we will be keeping all our React components, using the following command :
mkdir ./src/components
cd ./src/components
Now let's create the component having the navbar of our dApp. Create a new file called NavBar.jsx and paste the following code :
import React from "react";
import { Button, Navbar } from "react-bootstrap";

// This component renders the Navbar of our application
export function NavBar( props ){
    return (
        <Navbar bg="dark" variant="dark">
            <Navbar.Brand href="#home">
                Avalanche Chat App
            </Navbar.Brand>
            <Navbar.Toggle />
            <Navbar.Collapse className="justify-content-end">
                <Navbar.Text>
                    <Button style={{ display: props.showButton }} variant="success" onClick={ async () => { props.login(); }}>
                        Connect to Metamask
                    </Button>
                    <div style={{ display: props.showButton === "none" ? "block" : "none" }}>
                        Signed in as:
                        <a href="#">
                            { props.username }
                        </a>
                    </div>
                </Navbar.Text>
            </Navbar.Collapse>
        </Navbar>
    );
}
All the contacts will have a card with their name and public key. Create a new file called ChatCard.jsx and paste the following code :
import React from "react";
import { Row, Card } from "react-bootstrap";
import 'bootstrap/dist/css/bootstrap.min.css';

// This is a function which renders the friends in the friends list
export function ChatCard( props ){
    return (
        <Row style={{ marginRight:"0px" }}>
            <Card border="success" style={{ width:'100%', alignSelf:'center', marginLeft:"15px" }} onClick={ () => { props.getMessages( props.publicKey ); }}>
              <Card.Body>
                  <Card.Title> { props.name } </Card.Title>
                  <Card.Subtitle> { props.publicKey.length > 20 ? props.publicKey.substring(0, 20) + " ..." : props.publicKey } </Card.Subtitle>
              </Card.Body>
            </Card>
        </Row>
    );
}
Each message will be rendered by the Message component. This component will have the timestamp , senders' name and the message. Create a new file called Message.jsx and paste the following code :
import React from "react";
import { Row, Card } from "react-bootstrap";

// This is a functional component which renders the individual messages
export function Message( props ){
    return (
        <Row style={{ marginRight:"0px" }}>
            <Card  border="success" style={{ width:'80%', alignSelf:'center', margin:"0 0 5px " + props.marginLeft, float:"right", right:"0px" }}>
                <Card.Body>
                    <h6 style={{ float:"right" }}>
                        { props.timeStamp }
                    </h6>
                    <Card.Subtitle>
                        <b>
                            { props.sender }
                        </b>
                    </Card.Subtitle>
                    <Card.Text>
                        { props.data }
                    </Card.Text>
                </Card.Body>
            </Card>
        </Row>
    );
}
To add a new contact we will make AddNewChat component. It will show a modal on clicking the NewChat button and ask for the contact details. Create a new file called AddNewChat.jsx and paste the following code :
import React from "react";
import { useState } from "react";
import { Button, Modal, Form } from "react-bootstrap";

// This Modal help Add a new friend
export function AddNewChat( props ){
    const [show, setShow] = useState( false );
    const handleClose = () => setShow( false );
    const handleShow = () => setShow( true );
    return (
        <div className="AddNewChat" style={{ position:"absolute", bottom:"0px", padding:"10px 45px 0 45px", margin:"0 95px 0 0", width:"97%" }}>
            <Button variant="success" className="mb-2" onClick={ handleShow }>
                + NewChat
            </Button>
            <Modal show={ show } onHide={ handleClose }>
                <Modal.Header closeButton>
                  <Modal.Title> Add New Friend </Modal.Title>
                </Modal.Header>
                <Modal.Body>
                    <Form.Group>
                        <Form.Control required id="addPublicKey" size="text" type="text" placeholder="Enter Friends Public Key" />
                        <br />
                        <Form.Control required id="addName" size="text" type="text" placeholder="Name" />
                        <br />
                    </Form.Group>
                </Modal.Body>
                <Modal.Footer>
                    <Button variant="secondary" onClick={ handleClose }>
                        Close
                    </Button>
                    <Button variant="primary" onClick={ () => {
                        props.addHandler( document.getElementById('addName').value, document.getElementById('addPublicKey').value );
                        handleClose();
                    }}>
                        Add Friend
                    </Button>
                </Modal.Footer>
            </Modal>
        </div>

    );
}
Now lets create a new file called Components.js and export all the components together. Paste the following code :
export { NavBar } from "./NavBar";
export { AddNewChat } from "./AddNewChat";
export { Message } from "./Message";
export { ChatCard } from "./ChatCard";
Move out to the src directory and create a new file called App.jsx and paste the following code :
import React from "react";
import { useState, useEffect } from "react";
import { Container, Row, Col, Card, Form, Button } from 'react-bootstrap';
import { NavBar, ChatCard, Message, AddNewChat } from './components/Components.js';
import { ethers } from "ethers";
import { abi } from "./abi";

// Add the contract address inside the quotes
const CONTRACT_ADDRESS = "";

export function App( props ) {
    const [friends, setFriends] = useState(null);
    const [myName, setMyName] = useState(null);
    const [myPublicKey, setMyPublicKey] = useState(null);
    const [activeChat, setActiveChat] = useState({ friendname: null, publicKey: null });
    const [activeChatMessages, setActiveChatMessages] = useState(null);
    const [showConnectButton, setShowConnectButton] = useState("block");
    const [myContract, setMyContract] = useState(null);

    // Save the contents of abi in a variable
    const contractABI = abi;
    let provider;
    let signer;

    // Login to Metamask and check the if the user exists else creates one
    async function login() {
        let res = await connectToMetamask();
        if( res === true ) {
            provider = new ethers.providers.Web3Provider( window.ethereum );
            signer = provider.getSigner();
            try {
                const contract = new ethers.Contract( CONTRACT_ADDRESS, contractABI, signer );
                setMyContract( contract );
                const address = await signer.getAddress();
                let present = await contract.checkUserExists( address );
                let username;
                if( present )
                    username = await contract.getUsername( address );
                else {
                    username = prompt('Enter a username', 'Guest');
                    if( username === '' ) username = 'Guest';
                    await contract.createAccount( username );
                }
                setMyName( username );
                setMyPublicKey( address );
                setShowConnectButton( "none" );
            } catch(err) {
                alert("CONTRACT_ADDRESS not set properly!");
            }
        } else {
            alert("Couldn't connect to Metamask");
        }
    }

    // Check if the Metamask connects
    async function connectToMetamask() {
        try {
            await window.ethereum.enable();
            return true;
        } catch(err) {
            return false;
        }
    }

    // Add a friend to the users' Friends List
    async function addChat( name, publicKey ) {
        try {
            let present = await myContract.checkUserExists( publicKey );
            if( !present ) {
                alert("Given address not found: Ask him to join the app :)");
                return;
            }
            try {
                await myContract.addFriend( publicKey, name );
                const frnd = { "name": name, "publicKey": publicKey };
                setFriends( friends.concat(frnd) );
            } catch(err) {
                alert("Friend already Added! You can't be friend with the same person twice ;P");
            }
        } catch(err) {
            alert("Invalid address!")
        }
    }

    // Sends messsage to an user
    async function sendMessage( data ) {
        if( !( activeChat && activeChat.publicKey ) ) return;
        const recieverAddress = activeChat.publicKey;
        await myContract.sendMessage( recieverAddress, data );
    }

    // Fetch chat messages with a friend
    async function getMessage( friendsPublicKey ) {
        let nickname;
        let messages = [];
        friends.forEach( ( item ) => {
            if( item.publicKey === friendsPublicKey )
                nickname = item.name;
        });
        // Get messages
        const data = await myContract.readMessage( friendsPublicKey );
        data.forEach( ( item ) => {
            const timestamp = new Date( 1000*item[1].toNumber() ).toUTCString();
            messages.push({ "publicKey": item[0], "timeStamp": timestamp, "data": item[2] });
        });
        setActiveChat({ friendname: nickname, publicKey: friendsPublicKey });
        setActiveChatMessages( messages );
    }

    // This executes every time page renders and when myPublicKey or myContract changes
    useEffect( () => {
        async function loadFriends() {
            let friendList = [];
            // Get Friends
            try {
                const data = await myContract.getMyFriendList();
                data.forEach( ( item ) => {
                    friendList.push({ "publicKey": item[0], "name": item[1] });
                })
            } catch(err) {
                friendList = null;
            }
            setFriends( friendList );
        }
        loadFriends();
    }, [myPublicKey, myContract]);

    // Makes Cards for each Message
    const Messages = activeChatMessages ? activeChatMessages.map( ( message ) => {
        let margin = "5%";
        let sender = activeChat.friendname;
        if( message.publicKey === myPublicKey ) {
            margin = "15%";
            sender = "You";
        }
        return (
            <Message marginLeft={ margin } sender={ sender } data={ message.data } timeStamp={ message.timeStamp } />
        );
    }) : null;

    // Displays each card
    const chats = friends ? friends.map( ( friend ) => {
     return (
         <ChatCard publicKey={ friend.publicKey } name={ friend.name } getMessages={ ( key ) => getMessage( key ) } />
     );
    }) : null;

    return (
        <Container style={{ padding:"0px", border:"1px solid grey" }}>
            {/* This shows the navbar with connect button */}
            <NavBar username={ myName } login={ async () => login() } showButton={ showConnectButton } />
            <Row>
                {/* Here the friends list is shown */}
                <Col style={{ "paddingRight":"0px", "borderRight":"2px solid #000000" }}>
                    <div style={{ "backgroundColor":"#DCDCDC", "height":"100%", overflowY:"auto" }}>
                          <Row style={{ marginRight:"0px" }}  >
                              <Card style={{ width:'100%', alignSelf:'center', marginLeft:"15px" }}>
                                <Card.Header>
                                    Chats
                                </Card.Header>
                              </Card>
                          </Row>
                          { chats }
                          <AddNewChat myContract={ myContract } addHandler={ ( name, publicKey ) => addChat( name, publicKey )} />
                    </div>
                </Col>
                <Col xs={ 8 } style={{ "paddingLeft":"0px" }}>
                    <div style={{ "backgroundColor":"#DCDCDC", "height":"100%" }}>
                        {/* Chat header with refresh button, username and public key are rendered here */}
                        <Row style={{ marginRight:"0px" }}>
                              <Card style={{ width:'100%', alignSelf:'center', margin:"0 0 5px 15px" }}>
                                <Card.Header>
                                    { activeChat.friendname } : { activeChat.publicKey }
                                    <Button style={{ float:"right" }} variant="warning" onClick={ () => {
                                        if( activeChat && activeChat.publicKey )
                                            getMessage( activeChat.publicKey );
                                    } }>
                                        Refresh
                                    </Button>
                                </Card.Header>
                            </Card>
                        </Row>
                        {/* The messages will be shown here */}
                        <div className="MessageBox" style={{ height:"400px", overflowY:"auto" }}>
                           { Messages }
                        </div>
                        {/* The form with send button and message input fields */}
                        <div className="SendMessage"  style={{ borderTop:"2px solid black", position:"relative", bottom:"0px", padding:"10px 45px 0 45px", margin:"0 95px 0 0", width:"97%" }}>
                            <Form onSubmit={ (e) => {
                                e.preventDefault();
                                sendMessage( document.getElementById( 'messageData' ).value );
                                document.getElementById( 'messageData' ).value = "";
                            }}>
                                <Form.Row className="align-items-center">
                                    <Col xs={9}>
                                        <Form.Control id="messageData" className="mb-2"  placeholder="Send Message" />
                                    </Col>
                                    <Col >
                                      <Button className="mb-2" style={{ float:"right" }} onClick={ () => {
                                          sendMessage( document.getElementById( 'messageData' ).value );
                                          document.getElementById( 'messageData' ).value = "";
                                      }}>
                                        Send
                                      </Button>
                                    </Col>
                                </Form.Row>
                            </Form>
                        </div>
                    </div>
                </Col>
            </Row>
        </Container>
    );
}
Note: Write down the contract address obtained from
Implementing the smart contractsection in the variable calledCONTRACT_ADDRESSon line 9 ofApp.jsx.
Open the index.js file inside the src directory and paste the following code :
import React from "react";
import ReactDom from "react-dom";
import { App } from "../src/App.jsx";

ReactDom.render(
    <App /> ,
    document.getElementById('root')
);
Create a new file called abi.js in the src directory, and paste the following code :
export const abi = [
    {
        "inputs": [
            {
                "internalType": "address",
                "name": "friend_key",
                "type": "address"
            },
            {
                "internalType": "string",
                "name": "name",
                "type": "string"
            }
        ],
        "name": "addFriend",
        "outputs": [],
        "stateMutability": "nonpayable",
        "type": "function"
    },
    {
        "inputs": [
            {
                "internalType": "address",
                "name": "pubkey",
                "type": "address"
            }
        ],
        "name": "checkUserExists",
        "outputs": [
            {
                "internalType": "bool",
                "name": "",
                "type": "bool"
            }
        ],
        "stateMutability": "view",
        "type": "function"
    },
    {
        "inputs": [
            {
                "internalType": "string",
                "name": "name",
                "type": "string"
            }
        ],
        "name": "createAccount",
        "outputs": [],
        "stateMutability": "nonpayable",
        "type": "function"
    },
    {
        "inputs": [],
        "name": "getMyFriendList",
        "outputs": [
            {
                "components": [
                    {
                        "internalType": "address",
                        "name": "pubkey",
                        "type": "address"
                    },
                    {
                        "internalType": "string",
                        "name": "name",
                        "type": "string"
                    }
                ],
                "internalType": "struct Database.friend[]",
                "name": "",
                "type": "tuple[]"
            }
        ],
        "stateMutability": "view",
        "type": "function"
    },
    {
        "inputs": [
            {
                "internalType": "address",
                "name": "pubkey",
                "type": "address"
            }
        ],
        "name": "getUsername",
        "outputs": [
            {
                "internalType": "string",
                "name": "",
                "type": "string"
            }
        ],
        "stateMutability": "view",
        "type": "function"
    },
    {
        "inputs": [
            {
                "internalType": "address",
                "name": "friend_key",
                "type": "address"
            }
        ],
        "name": "readMessage",
        "outputs": [
            {
                "components": [
                    {
                        "internalType": "address",
                        "name": "sender",
                        "type": "address"
                    },
                    {
                        "internalType": "uint256",
                        "name": "timestamp",
                        "type": "uint256"
                    },
                    {
                        "internalType": "string",
                        "name": "msg",
                        "type": "string"
                    }
                ],
                "internalType": "struct Database.message[]",
                "name": "",
                "type": "tuple[]"
            }
        ],
        "stateMutability": "view",
        "type": "function"
    },
    {
        "inputs": [
            {
                "internalType": "address",
                "name": "friend_key",
                "type": "address"
            },
            {
                "internalType": "string",
                "name": "_msg",
                "type": "string"
            }
        ],
        "name": "sendMessage",
        "outputs": [],
        "stateMutability": "nonpayable",
        "type": "function"
    }
]
An Application Binary Interface (ABI) is a JSON object which stores the metadata about the methods of a contract like data type of input parameters, return data type & property of the method like payable, view, pure etc. You can learn more about the ABI from the solidity documentation
Now its time to run our React app. Use the following command to start the React app.
npm start
Walkthrough
Visit http://localhost:3000 to interact with the app.
User registration and adding a new friend
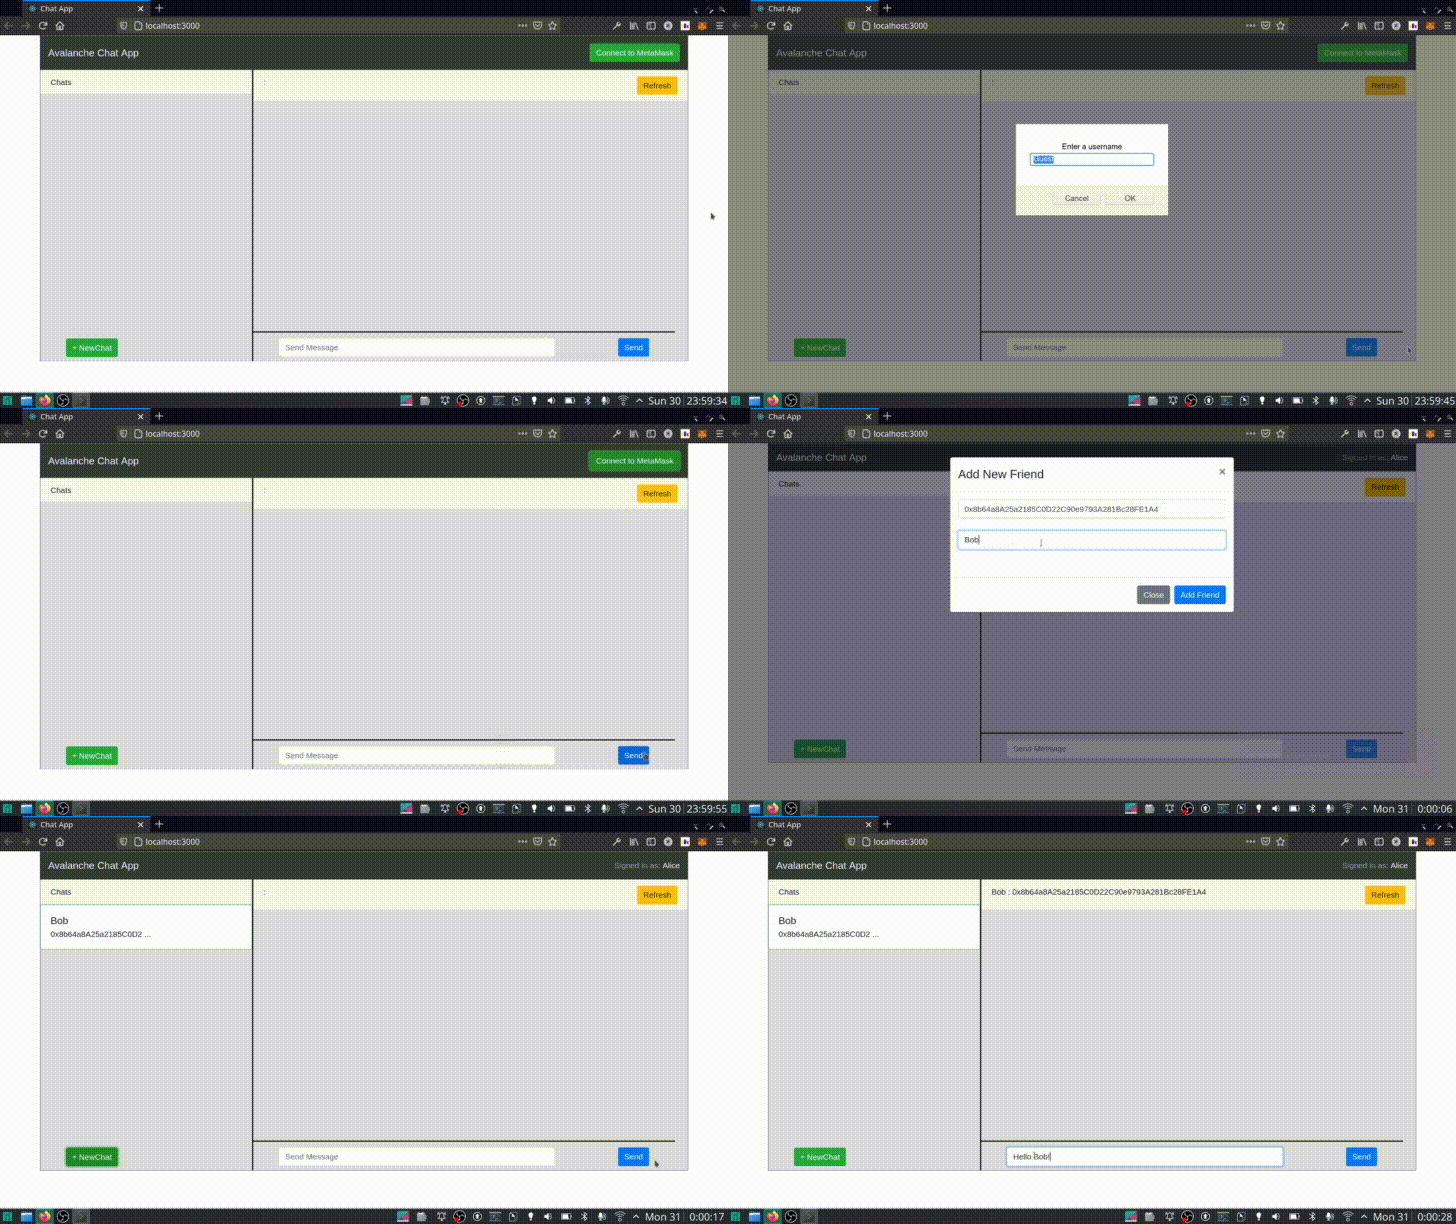
Make sure your friend is also registered to the application while adding him as a friend.Chatting with friend
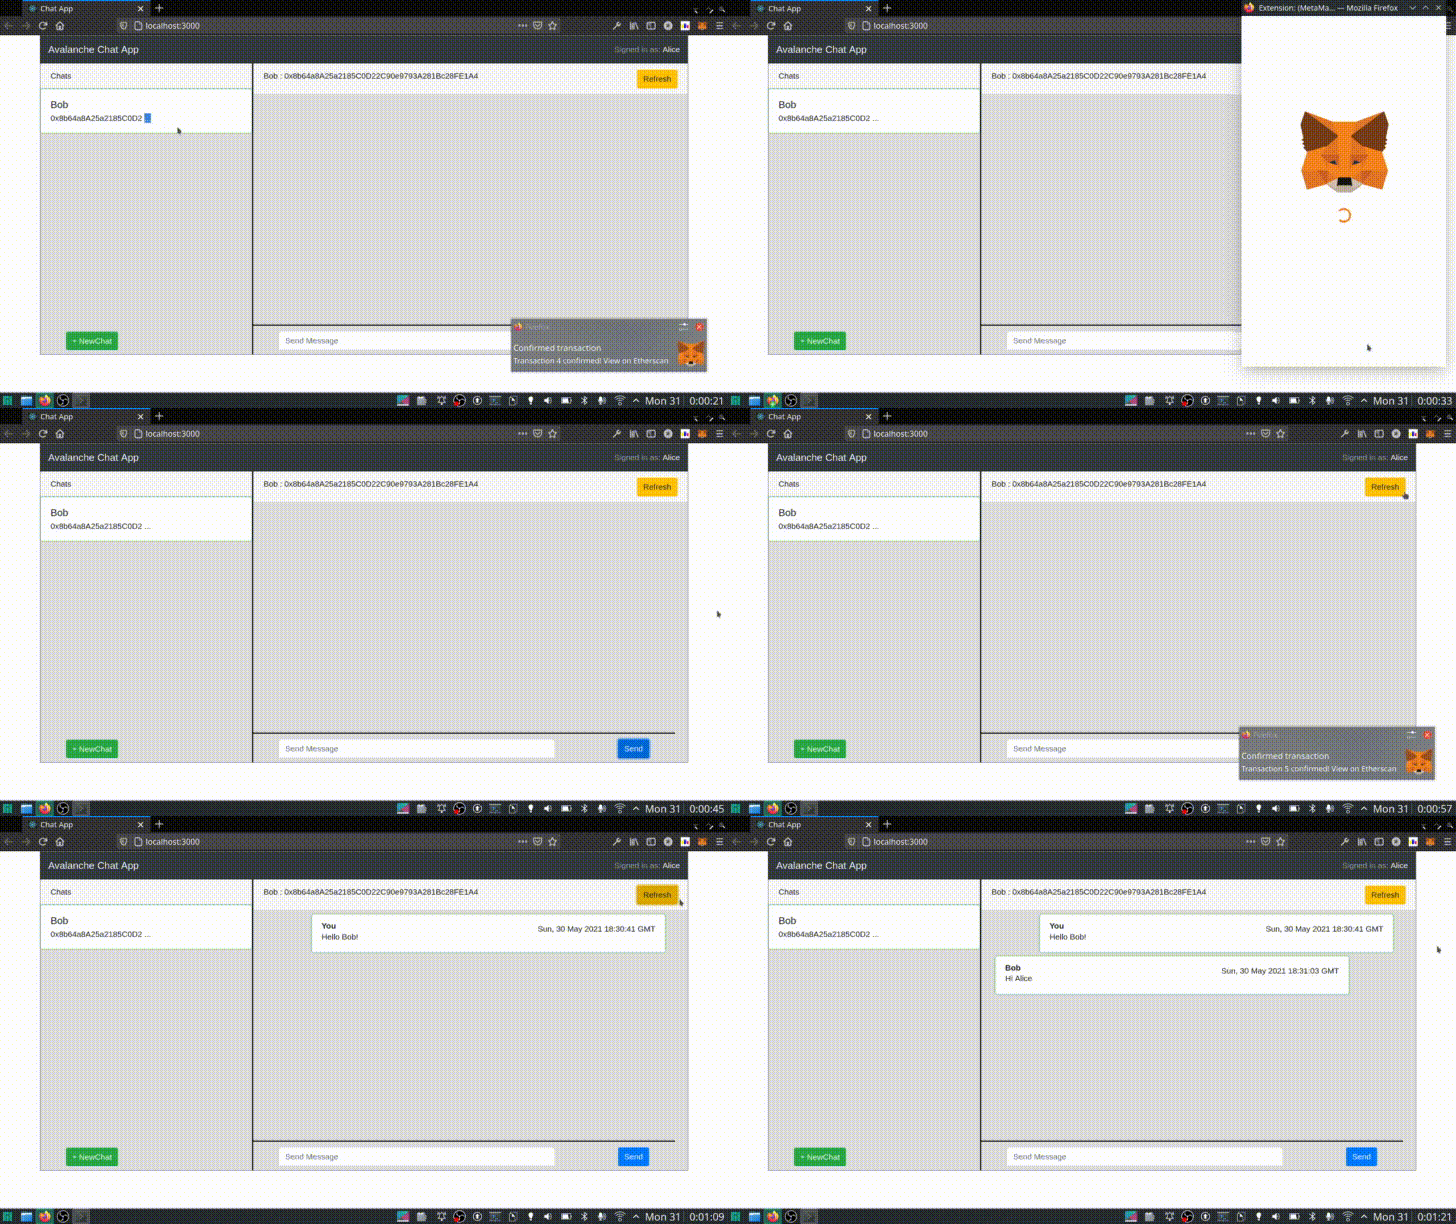
Conclusion
Congratulations! We have successfully developed a decentralized chat application which can be deployed on Avalanche. We also created a boilerplate React application to use as the frontend for our dApp. As a next step, You can improve the application by adding features like delete messages, block users, or create groups of friends. You can also optimize the gas cost by limiting the maximum number of messages stored.
Troubleshooting
Transaction Failure
- Check if your account has sufficient balance at fuji block-explorer. You can fund your address from the given faucet
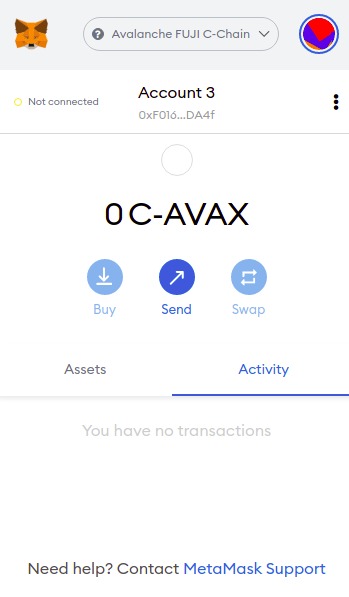
- Make sure that you have selected the correct account on metamask if you have more than one account connected to the site.
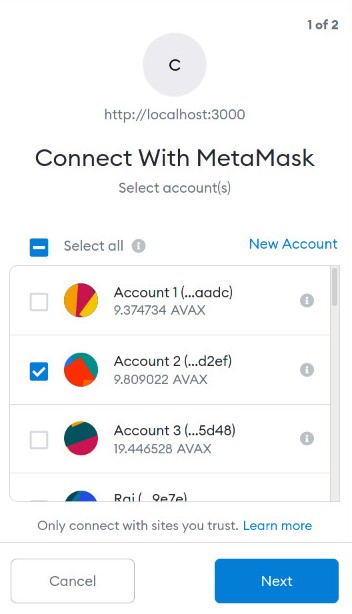
Application crash
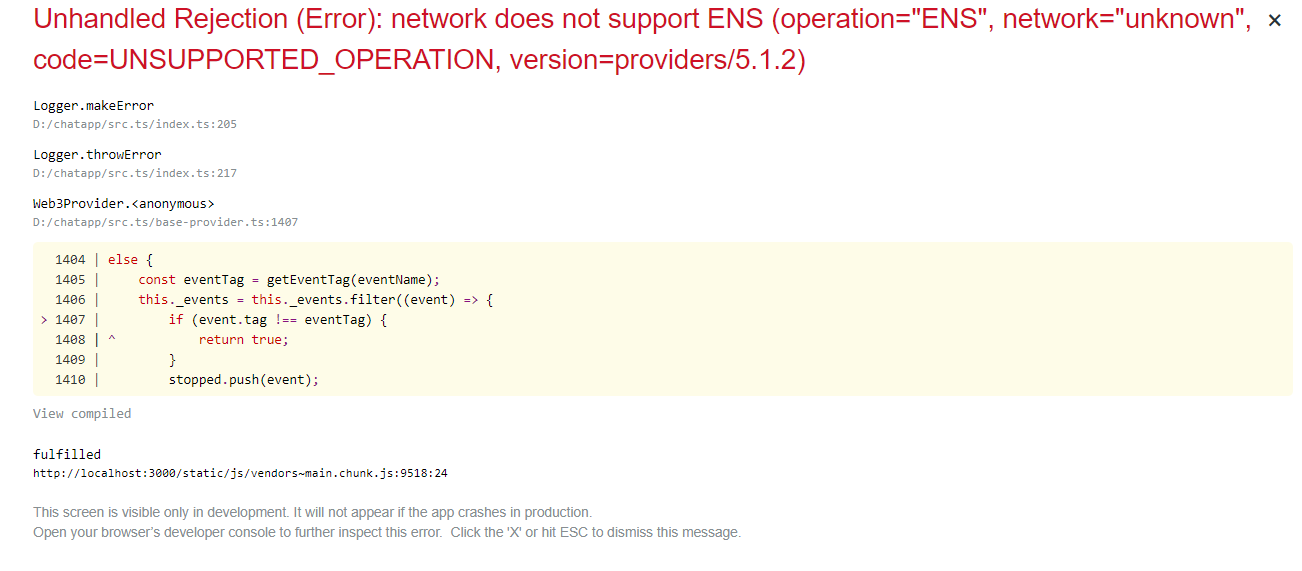 Check if you have updated the
 CONTRACT_ADDRESS variable in src/index.js properly!
About the Author(s)
The tutorial was created by Nimish Agrawal & Sayan Kar. You can also reach out to them on LinkedIn @Nimish Agrawal and @Sayan Kar.
References
- Smart contract deployment process - Deploy a Smart Contract on Avalanche using Remix and MetaMask